Project administration
Help guide for project administrators
- Projects
- Members
- Adding and removing members
- Managing member permissions
- Managing member assignments
- Assigning members to installations on a line
- Installations (Traps, Bait Stations, Monitoring Stations and POIs)
- Installations overview
- Installation fields
- Adding installations
- Adding installation records
- Deleting installation records
- Adding supplementary traps
- Editing a single installation
- Bulk editing installations
- Downloading installation data
- Sorting installations
- Moving installations
- Moving installations between projects
- Retiring installations
- Deleting installations
- Lines
- Organisations
Projects
In order to start adding traps and recording catches, you need to be part of a project. Projects allow people to collaborate on predator management projects in specific geographical regions. A project can range from being small (just you in your own backyard) to large (a suburb, a farm, a region etc).
You can create your own project, or you can join an existing project.
Creating a new project
If there isn't a nearby project for you to join, or you'd like to create your one, you can create a new Rappt.IO project.
- Go to "My Projects" and click the "Create a new project" button near the bottom of the page.
- Fill out the form with the details for your project (only fields marked with an asterisk* are required):
- Listing your project publicly and providing as much information as possible will make it easier for others to find your project and request to join in.
- Sharing summary data allows information from your project (eg. trap numbers, catch counts, baits used, etc.) to be used by other websites. Making summary data available contributes to the national dataset and is invaluable for research into predator control in Australia. You can see an example of how this information is used at Predator Free Wellington. Personal details are not shared and individual trap locations are aggregated at a 200m (4 hectare) square grid level.
- Use the map controls to zoom into your desired project area
- The +/- icons in the top left corner of the map can be used to zoom
- You can pan around the map by clicking and dragging anywhere on the map
- The <-> icon in the top right of the map can be used to make the map full screen
- You can escape fullscreen mode by pressing the X icon in the top right of the map
- Draw the area of your project on the map
- Make sure that the area you want your project is completely visible within the map view before you begin
- Click the polygon tool (the pentagon icon at the bottom of the map) then draw on the map to define the area you want to manage.
- There are detailed instructions available on how to use the map drawing tool.
- If you have WKT format data from a GIS system (eg. ArcGIS or Quantum) you can cut and paste the WKT into the Data box beneath the map instead of manually drawing a map.
Note: the CRS is ESPG:4326
- Fill out any parts of the "Contact details" section that you wish to (you can edit this later)
- Click the "Save" button at the bottom of the page
Once you've created your project you can start adding lines, traps and bait stations, monitoring stations, and points of interest, and you can invite others to join your project.
For video help click the you tube link here https://www.youtube.com/watch?v=ozNCAAqJlfU
Editing project details
Only users with an "Administrator" role in a project can access these tools.
As an Administrator, you can edit the details for an existing project, including your project's name, boundary, description and contact details.
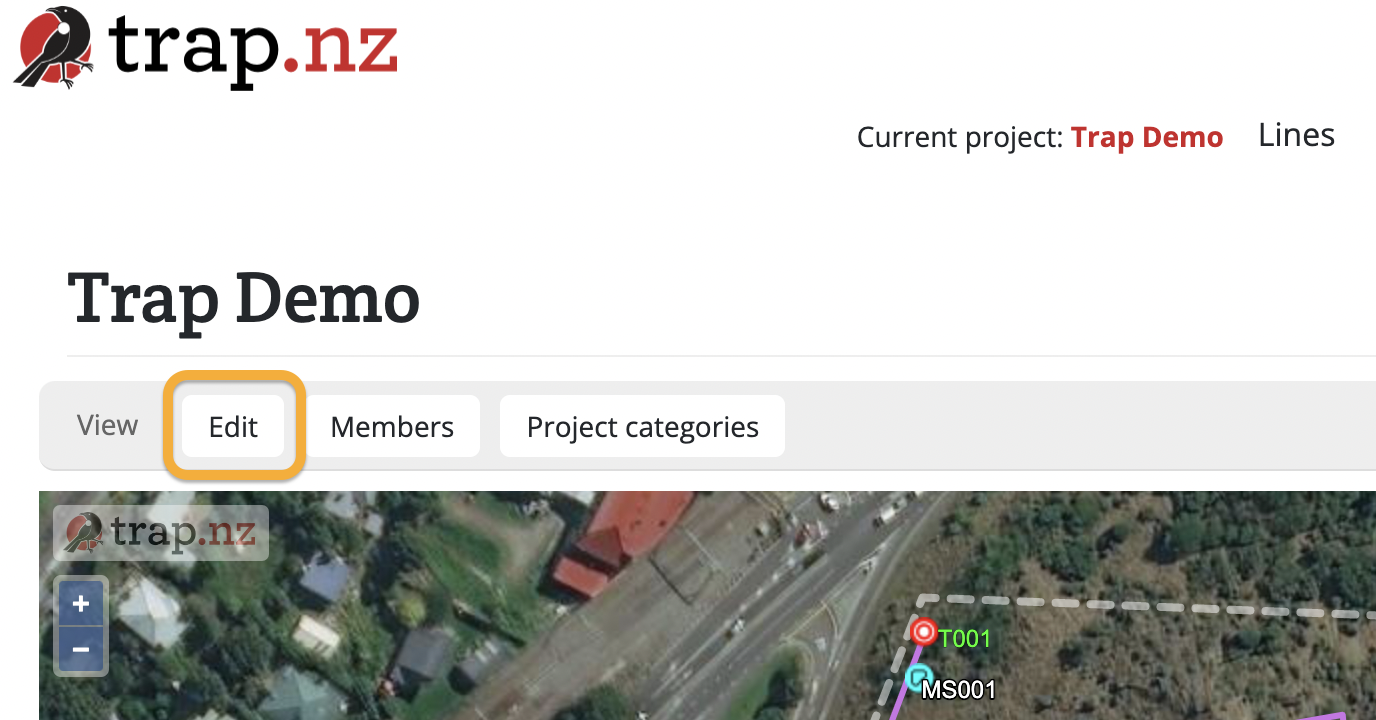
To edit project details:
- Select the project from your My Projects list
- Click the "Edit" button

- A form will load, including a project map with your current project boundaries visible
- You can edit any of the fields, and edit the project boundary on the map
- Click the green "Save" button to save your changes
For video help, click the youtube link here https://youtu.be/HcrtWLEzMAg
Project Categories
You must be a project Administrator have access to the "Project categories" section.
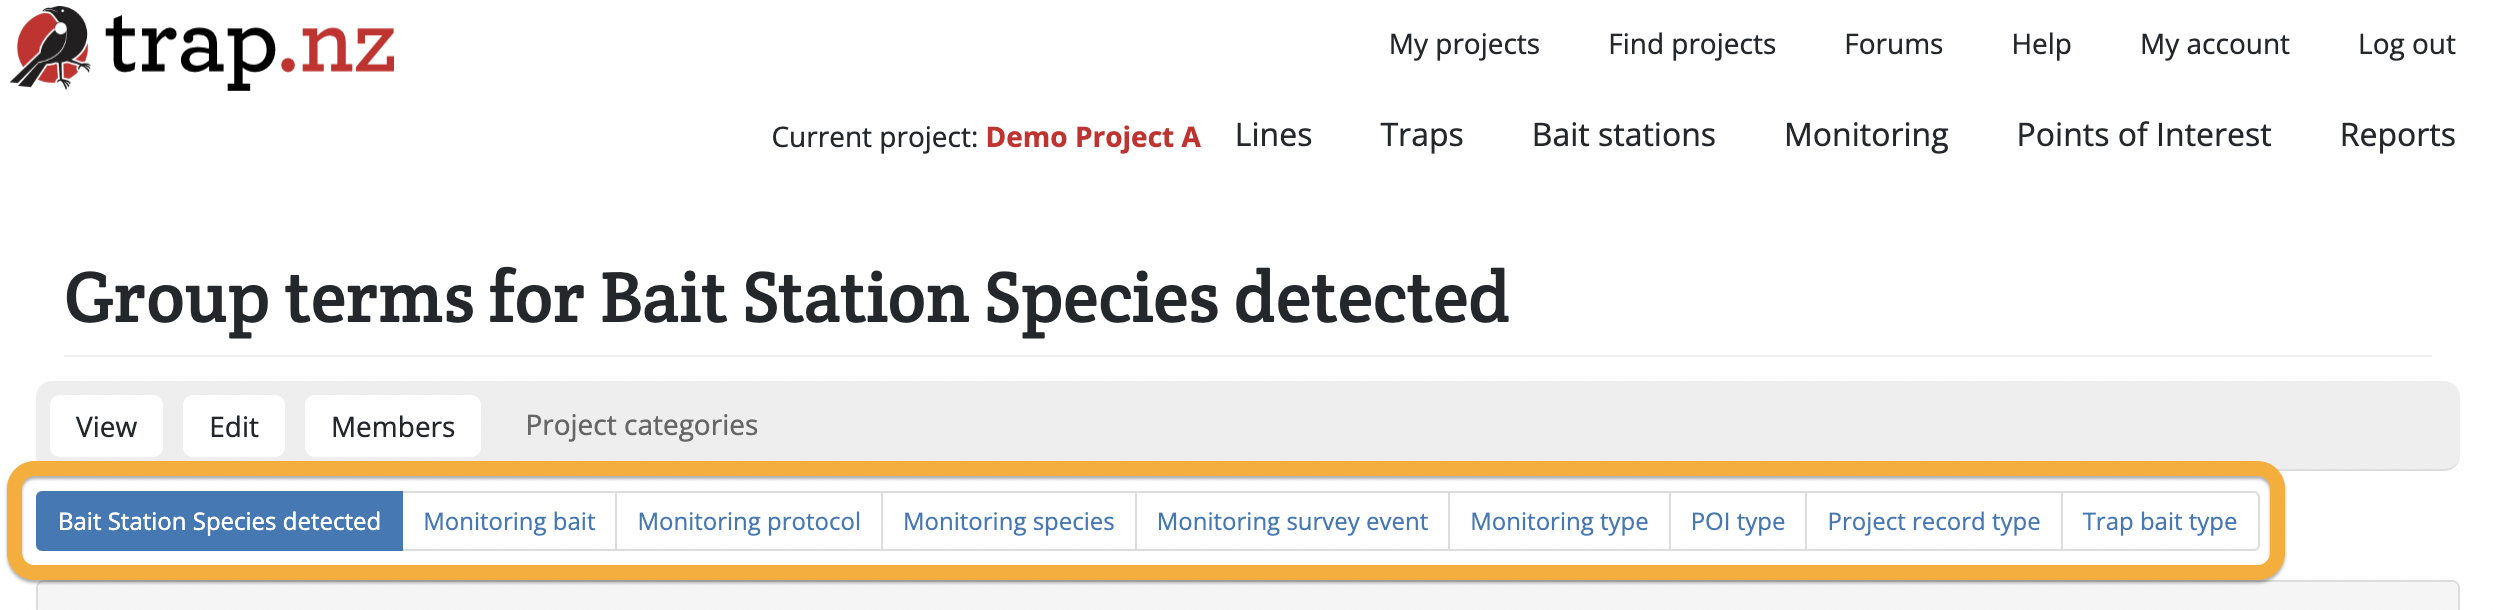
Project categories allow Administrators to customise some aspects of their project, such as:
- Bait station species detected
- Monitoring bait
- Monitoring protocol
- Monitoring species
- Monitoring survey event
- Monitoring type
- POI type
- Project record type
- Trap bait type
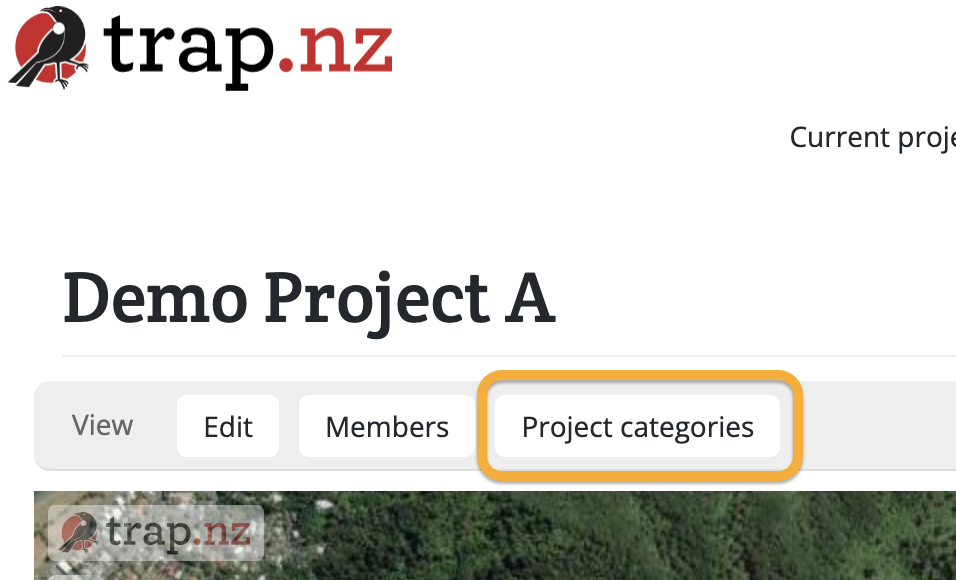
Accessing the Project categories section
- Select the project from your My Projects list
- Click the "Project categories" button

- The Project categories section will load, with a submenu showing all the categories that can be customised

- Click on the section you wish to edit
Project terms
Each Project categories section has two parts
- Default terms
- Your terms
Default terms
Default terms are terms that Rappt.IO give you "out of the box". This section allows you to select which "Default terms" to show/hide in your project. The checkboxes next to each default term indicate which terms will be visible, and which terms will be hidden, to all members of your project.
Your terms
"Your terms" are terms that have been added by a Project Administrator, and are specific for each project. They do not need to be ticked like the Default terms above them - their mere presence means they will be visible to the members of your project. The checkbox for each custom term allows you to perform actions on them - reassign or delete.
For video help click the you tube link here https://youtu.be/Zv90Q7fPGVE
Deleting your project
Only users with an "Administrator" role in a project can access these tools.
As an Administrator, you can delete an existing project. Please note, all the project information will be lost once a project has been deleted.
To delete a project:
- Select the project from your My Projects list
- Click the "Edit" button
- Scroll to the bottom of the form that loads, and click the red "Delete" button
- On the confirmation screen, click the "Delete" button
- Your project has been deleted!
Members
Projects need Administrators, Managers, and Trappers. In backyard projects, that's the same person. Big projects will have dedicated people across all these roles. Find out more here.
Adding and removing members
As the Administrator of a project, you are able to add, invite and remove people from the project. You can also control who is able to see and update traps.
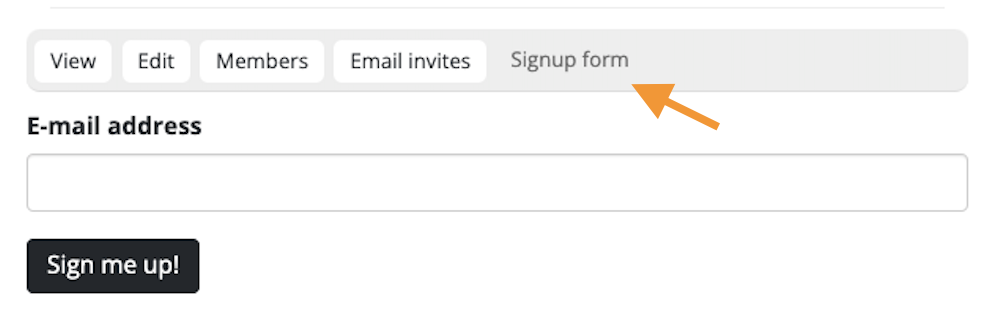
Adding new members using the Signup form
Administrators can add new and existing users to a project using the "Signup form". This allows admins to take full control of the project signup process. Useful for signup events where folks can use a provided device to join a project, for adding trappers while on the go, and for trappers who are not so tech savvy.
The form checks if the email address is already registered on Rappt.IO.
-
- If they are registered, it adds the trapper to the project, sets the trapper as active, and sends a courtesy email to the trapper.
- If they are not registered, it allows the administrator to register the new trapper first, then adds them to the project, sets them as active, and sends them the courtesy email.
Note - members added this way will have the basic Trapper role.
Inviting new members
Rappt.IO allows you to invite users to join a project. Adding members this way allows bulk invites, and role setting at the same time.
- Go to My Projects and click on the name of the project you want to manage.
- Click on the "Members" tab, then on the "Email invites" tab that appears.
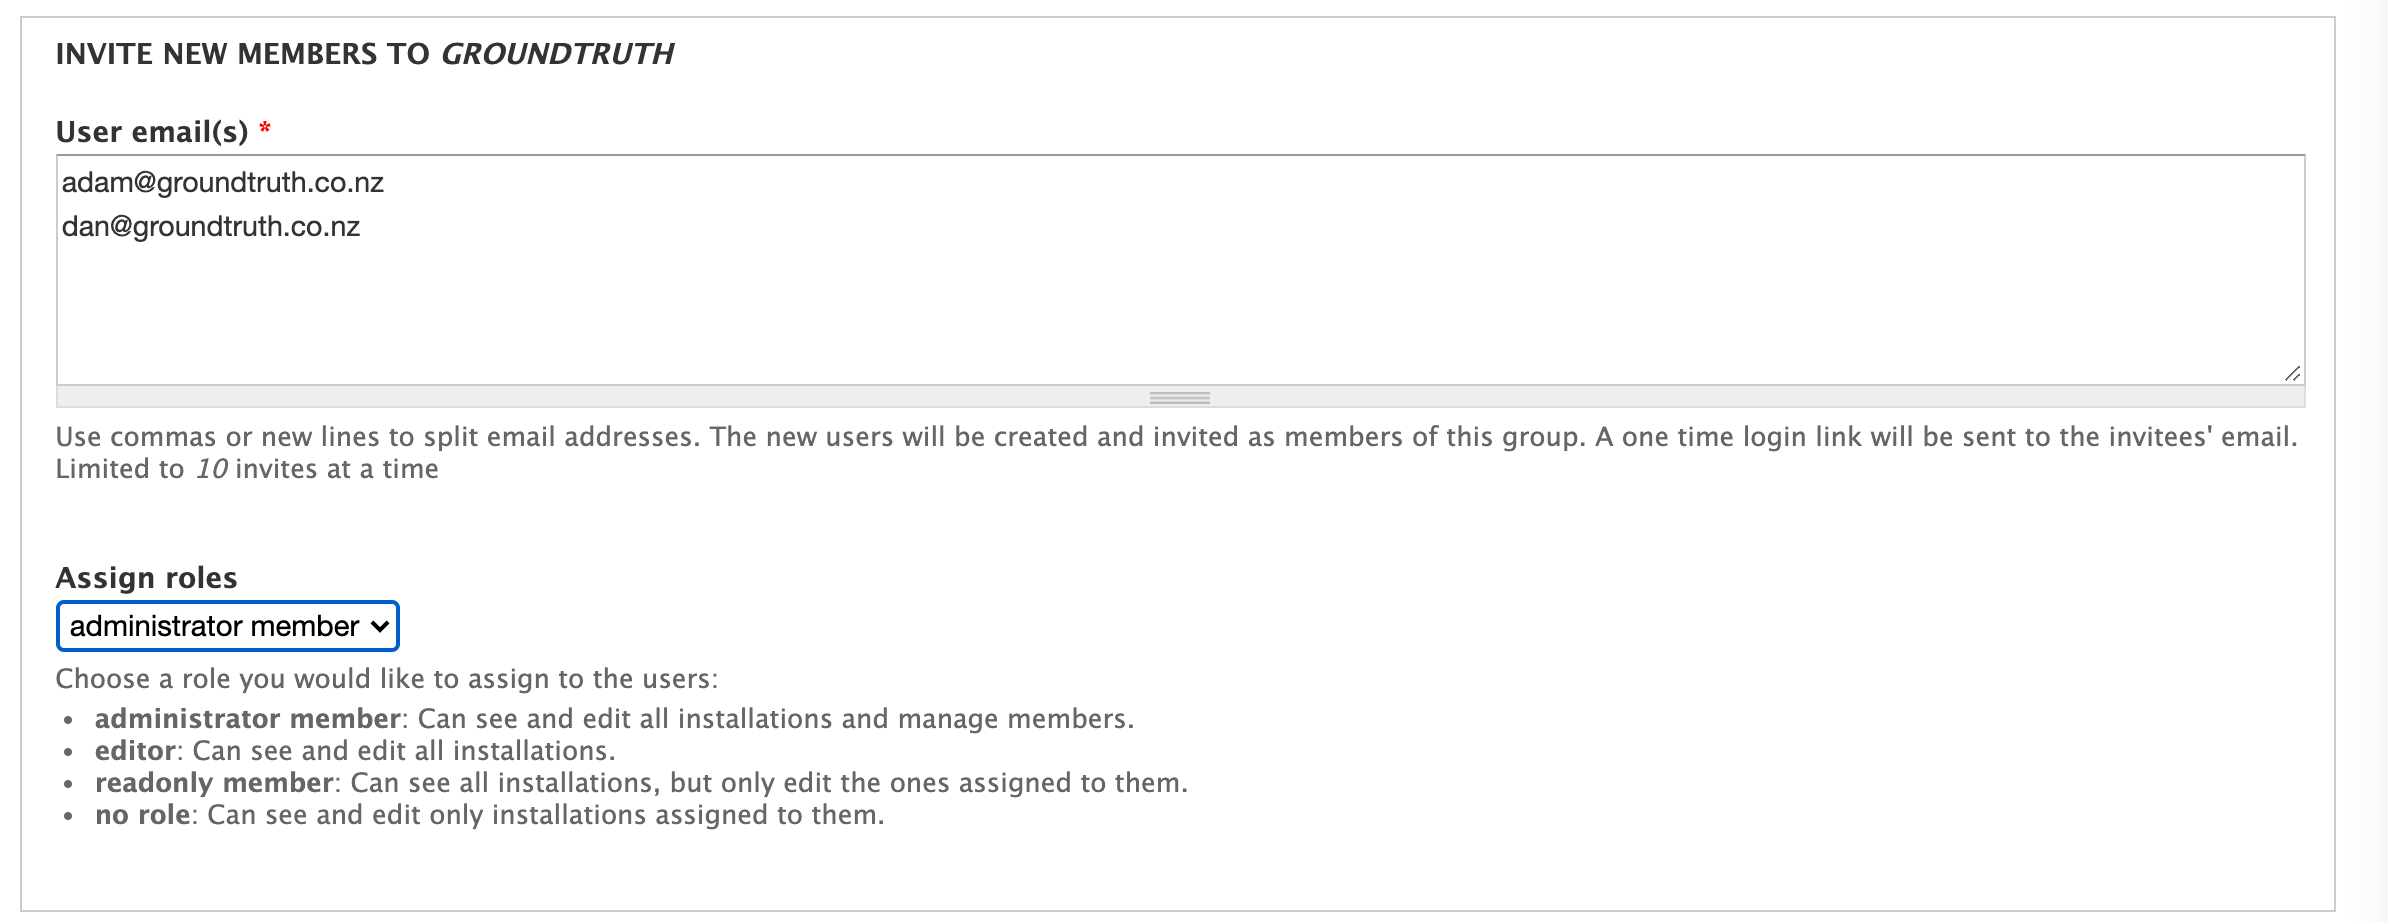
- Type the email address you want to invite into the "User email(s)" text box
- If you want to invite more than one person, you can list multiple email addresses. You either need to put each address on its own line, or put a comma in between each address.
- You can assign roles for these users using the "Assign roles" dropdown menu. If you're adding more than one member and they will have different roles, you can edit each person's role later.
- Click the "Invite user(s)" button.
The invitee will receive an email with a link with an invitation to the project.
Adding somebody who has requested to join your project
- To approve a request, go to "My projects" and click on the name of the project you want to manage.
- Click the "Members" tab.
- New requests will show up with as "Pending" in the Status column. If they included a message with their request it will be visible under "Message".
- To approve their request click "Activate".
- To refuse their request click "Revoke".
Removing members
- Go to "My projects" and click on the name of the project you want to manage.
- Click the "Members" tab.
- Find the member you wish to remove
- Clicking "Revoke" will remove them permanently from the project
- Clicking "Deactivate" will set their status back to pending. They will no longer be able to see anything in the project, but they will remain in the list of members so they can be approved again later.
Managing member permissions
There are four roles which project members can have within a Rappt.IO project: Trapper, Advanced trapper, Manager, and Administrator (note that some roles were renamed in November 2021). Roles are used to grant assorted permissions to project members.
By default, all new members are assigned as Trapper and can be given broader permissions by an Administrator of the project.
Description of role permissions
- Pre-authenticated member This is a person who has created a Rappt.IO account but has not verified their account.
- Trappers (previously No role):
- Can add new lines and installations to a project.
- Can view, edit, and add records to installations which they've added, or have been assigned to.
- Advanced trappers (previously Read only):
- Can do everything above, and also…
- Can view any installation in the project (web only, the app displays only owned and assigned installations)
- Managers (previously Editor):
- Can do everything above, and also…
- Can edit or delete any installation in the project
- Can add, edit, delete records from any installation in the project
- Can run reports on the project
- Administrators:
- Can do everything above, and also…
- Can add and remove users from a project
- Can change the role of any project member
- Can assign members to installations
- Can configure project specific settings (like new bait types)
- Can edit the general information about the project (geographic area the project covers, description, contact details etc.)
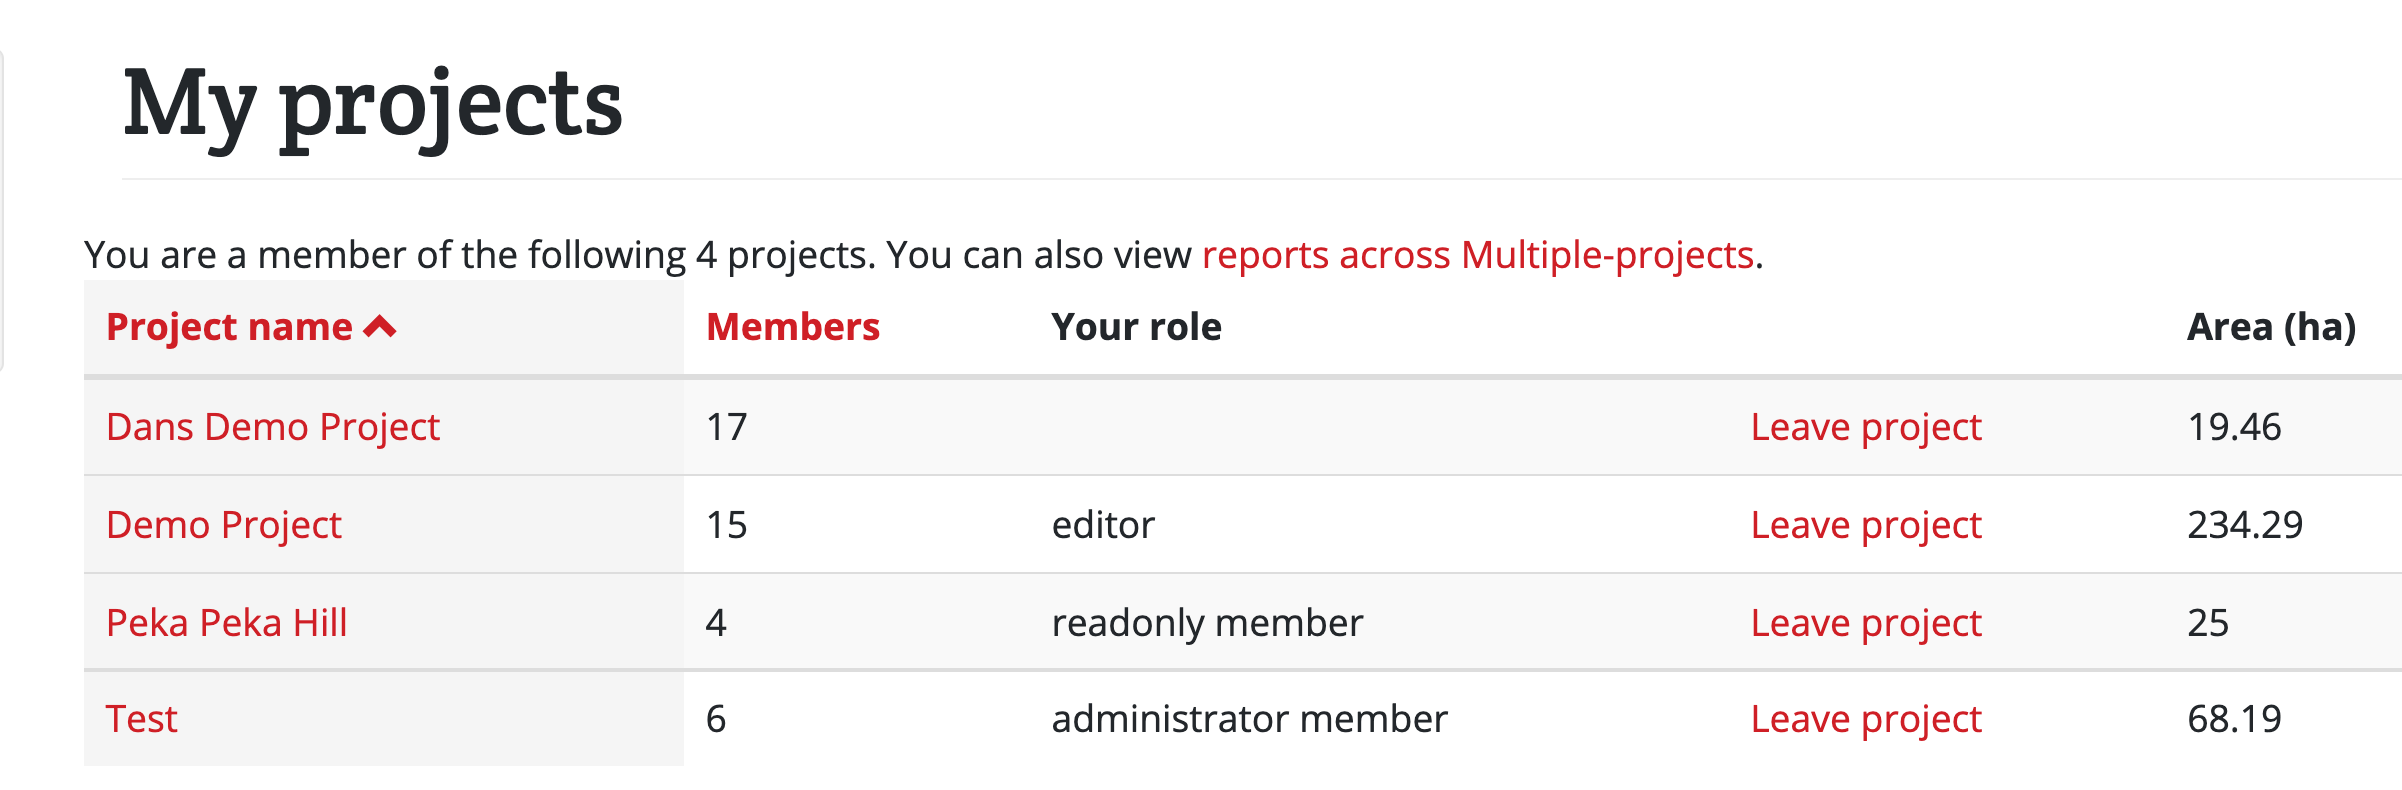
How to tell what role you have in a project
- Go to the My projects menu. You can see your role in each of your projects.

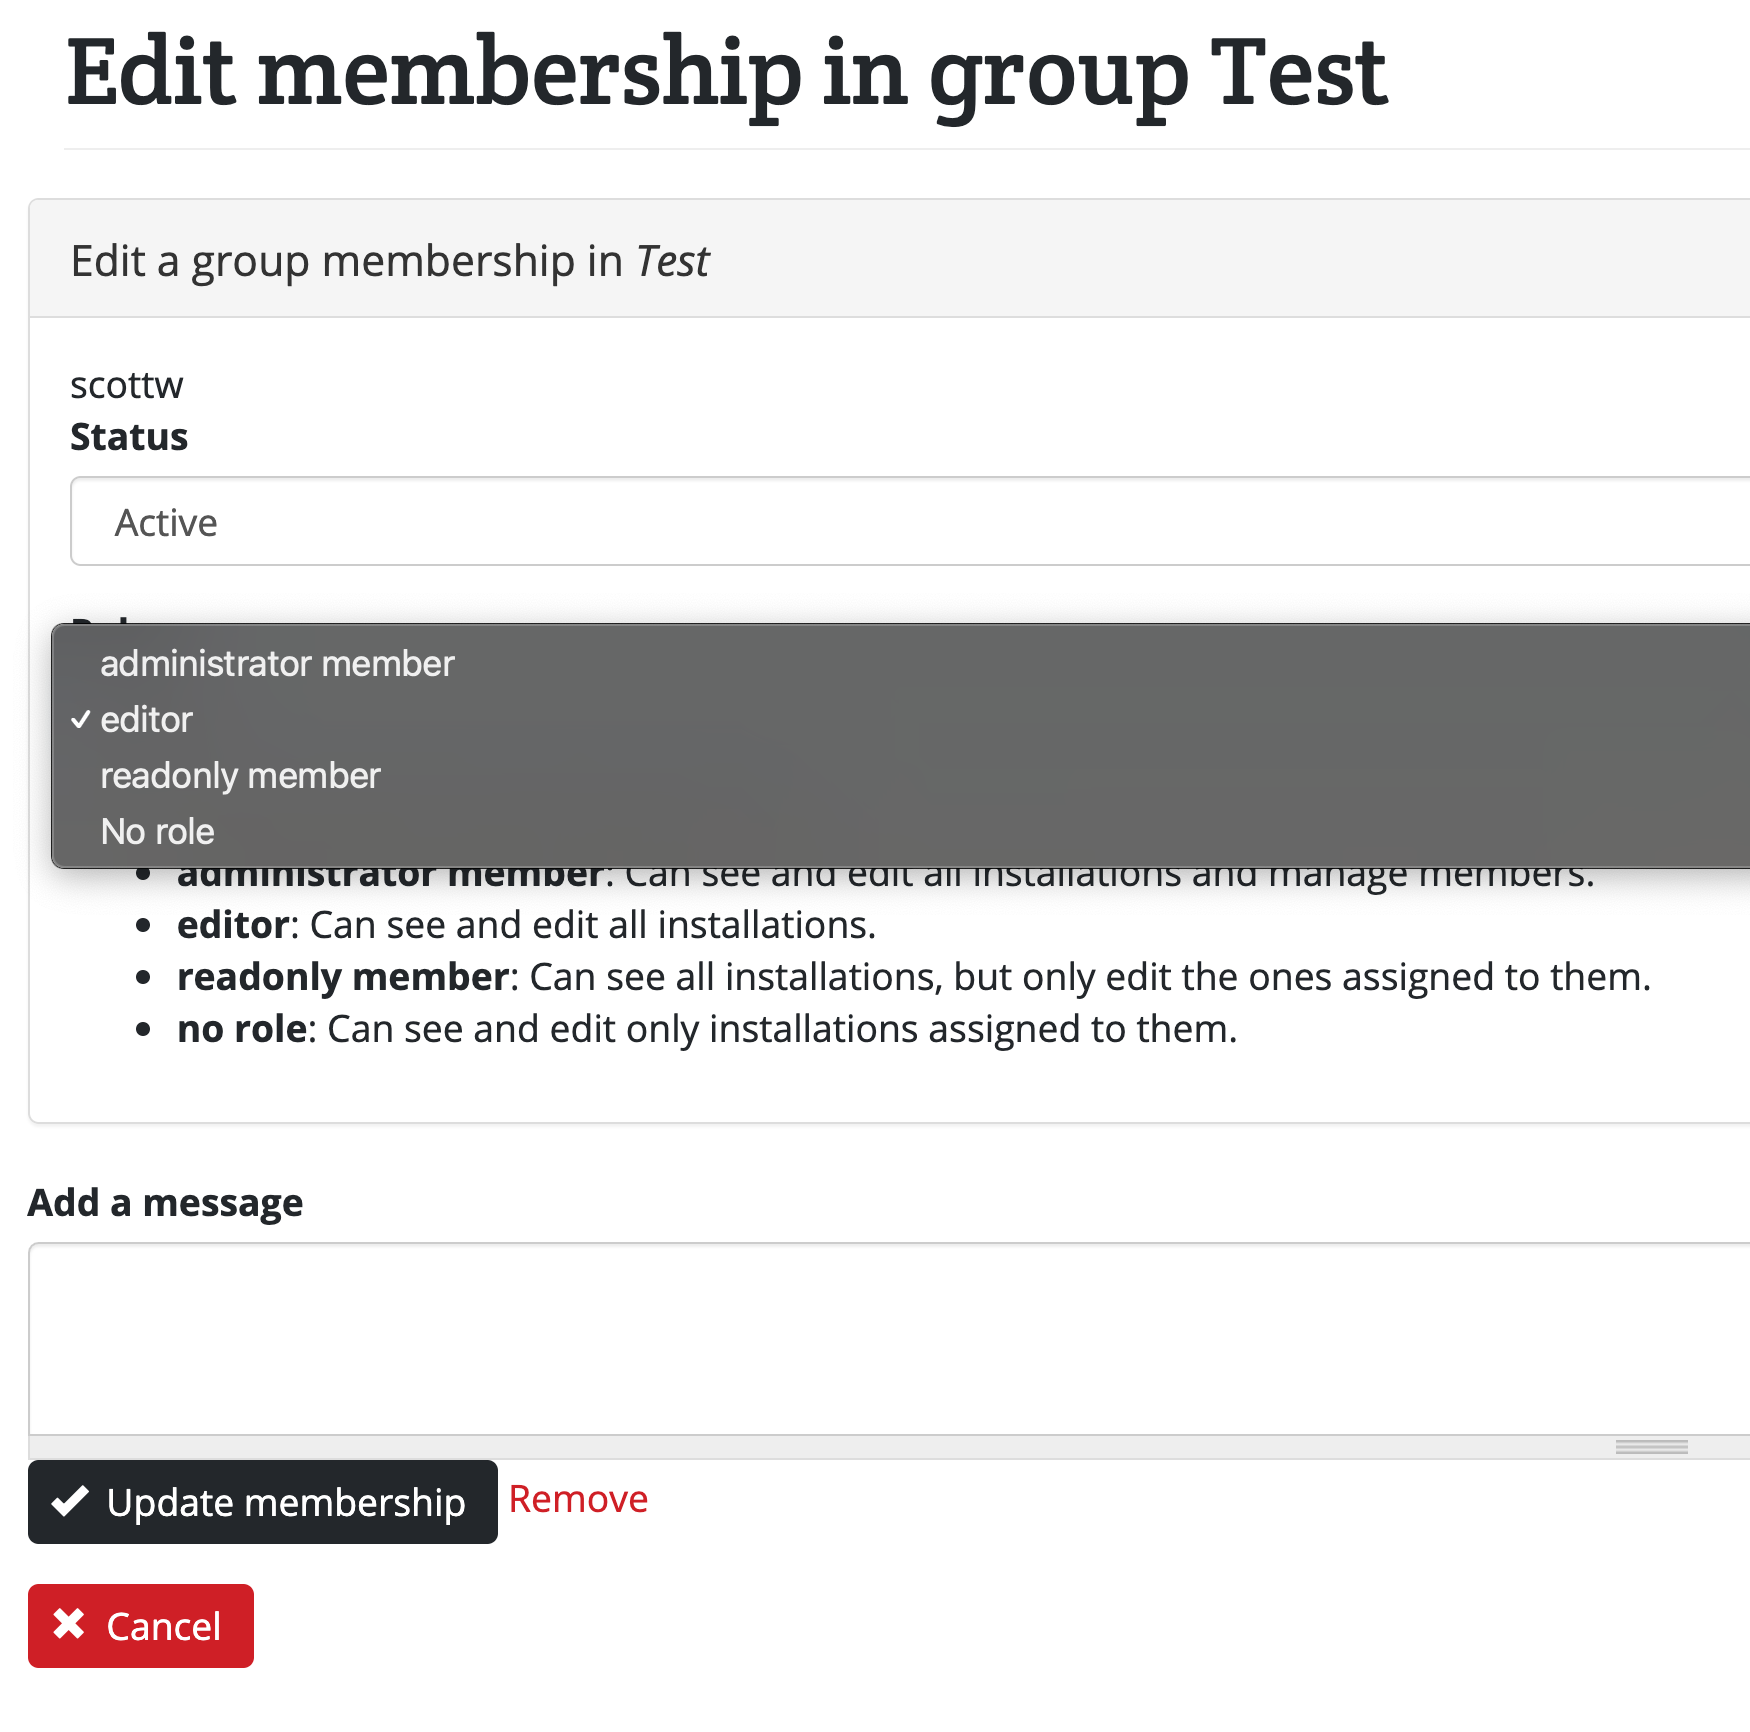
How to change a member's role
Changing a member's role can only be done by a project administrator.
- Go to the My projects menu and click on the name of the project you want to manage
- Click the "Members" tab
- Find the person whose role you want to change and click "Edit" to the far right of their name
- Under "Roles", select the dropdown and choose the new role you would like to assign
- Click the "Update membership" button
Managing member assignments
Assign members to installations
By default, members with the Trapper or Advanced trapper role can only make changes to installations which they have added to the project. If you want someone with these roles to be able to make changes to other installations, you can assign additional installations to them:
- Go to My projects and click on the name of the project you want to manage
- Go to the Traps, Bait stations or Monitoring menu, then click Manage traps, Manage bait stations or Manage stations.
- (optional) Use the filters to filter your installation list (e.g. filter by line by selecting the line from the Line filter), then click Apply
- In the Operations box select Assign members in the dropdown
- Select the tick boxes next to the traps you want to add members to
- Click Execute
- Click on the Select members to assign dropdown and choose which members you want to add to the previously selected traps
- Click Next and review your changes
- Click Confirm
These members will now be able to add, edit, and delete records for the selected stations (and edit the station details).
Unassign members from installations
To remove a member's access to an installation, repeat the above steps but choose Unassign Members at step 3.
Remember that members with Manager or Administrator roles will always have access to all stations - you cannot remove their access to particular stations.
View member assignments to installations
- Go to My projects and click on the name of the project you want to manage
- Go to the Traps menu, then Manage traps
- At the far right of the each row in the traps table you will see a message which says X member(s) assigned
- Click on the X member(s) assigned to see the names assigned to that trap
Assigning members to installations on a line
Only users with an "Administrator" role in a project can access these tools.
By default, members with the Trapper or Advanced Trapper role can only add records to installations which they have added to the project themselves. If you want someone with these roles to be able to add records to other installations, you can assign existing installations to them.
Before you start, make sure all the installations already belong to the line you want to work with.
The instructions below describe how to assign all the traps on a line to project members. The same instructions can be used to assign other installation types, just replace the word "trap" with the appropriate installation type.
How to assign the traps on a line to a member(s)
- From the "My projects" page, select the project you want to manage
-
Click on the "Traps" section
-
Click on "Manage traps"
- Select which line you want to add members to from the Line dropdown filter
- Click the green "Apply filter" button
- Select the checkboxes for all the traps you want to add members to. If you want to select all the traps on the line in one go, tick the checkbox at the top of the checkbox column, to the left of the "Number/Code" heading - this will select all the traps visible on the table. If you have more than one page of traps for this line, and you want to add members to them all, click the black button at the top of the table that says "Select all xx rows in this view".
- In the "Operations" dropdown box, select "Assign members" in the dropdown
- Click "Execute"
- From the "Select members to assign" dropdown, choose which project members you want to add to the previously selected traps.
- Click "Next" and review your changes
- Click "Confirm"
These members will now be able to add, edit, and delete records for the selected traps, and edit the trap details.
Installations (Traps, Bait Stations, Monitoring Stations and POIs)
Traps, Bait Stations Monitoring Stations and POIs (Points of Interest) are all types of installations - the fundamental parts of the Rappt.IO system.
Installations overview
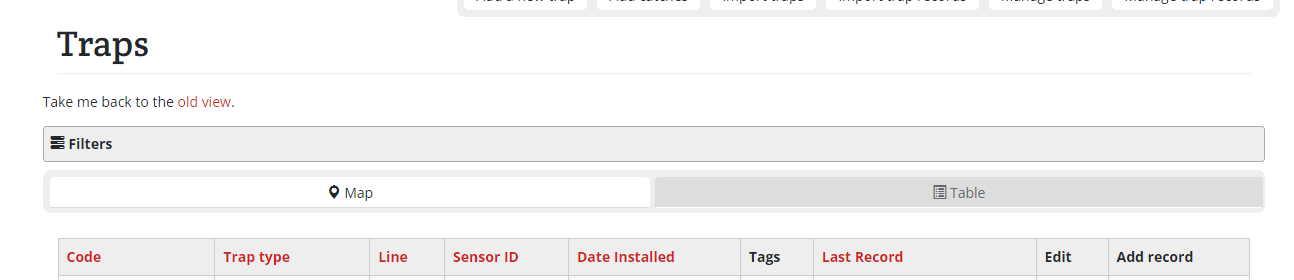
The Traps, Bait Stations, Monitoring Stations and Points of interest sections of your project allow you to view and manage your installations. It displays them visually on a map, and as a table , underneath the map after you've clicked the "Show Results" button on the filter bar.
You can view the details of an installation by clicking on its icon on the map (and then clicking the link on the popup), or by clicking its Number/Code in the table under the map.
You can also filter installations by line or type, and search for them by their name.

Installation fields
Glossary of terms for each field for each installation
Traps
Fields for adding a trap. Required fields are indicated by *
Trap number*: a reference name for this trap (it doesn't actually have to be a number), this is what will be displayed on the map and can be whatever you wish. If you have a lot of numbered traps it is useful to add leading zeros to the number (e.g. T001, T002. etc). This will allow you to easily sort them numerically by clicking the column header.
Date installed*: defaults to today's date. This date can be used for maintenance purposes (e.g. you may want to identify traps older than a certain date for replacement).
Installed by: the name of the person who installed this trap.
Trap type*: select the type of trap from the drop-down list. If your trap type is not listed select "Unspecified" and use the "Trap subtype" field to describe it.
Double trap: check this box if the trap is a double set, or has another trap attached (you can also add supplementary traps later).
Trap sub type: optionally enter any information such as modifications.
Sensor provider: if this trap has a sensor attached, you can enter the name of the sensor make or provider (E.g. Econode, Encounter Solutions Ltd, MinkPolice, etc.). When you start typing, the matching provider names will automatically appear.
Sensor ID: the unique ID of the radio sensor from the provider (this is usually a serial number written on the sensor).
Send meta data about this trap to my sensor provider: Checking this box will provide the trap location and other details to the sensor provider. This may help them manage their networks.
Trap line: optionally select the line you would like the trap associated with. This can make it easier when recording trap data in the field.
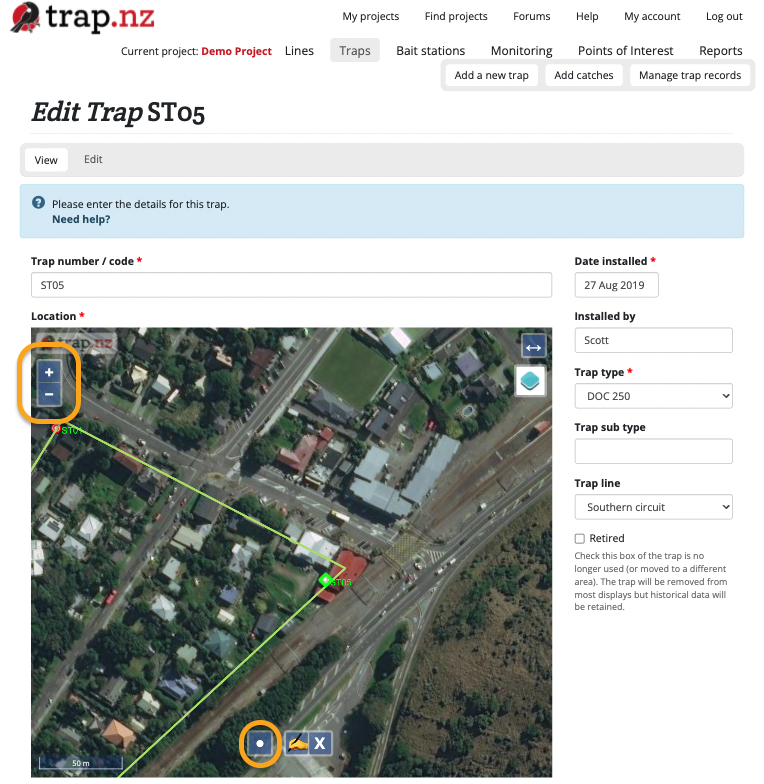
Location*: There are two different ways to place your trap on the map:
- Map: Use the Draw Point tool
 to locate the trap on the map. Hold and drag to pan around the map. Click on + or - to zoom in and out.
 - Manual coordinates: If you have a GPS location you can enter that in the Manual coordinates field and then click the "Find using Manual Coordinates field" to add it to the map.
Images: you can upload one or images of this trap
Notes: enter any other information you want to keep with this trap (access, location description, etc.).
Retired: check this box if the trap is no longer used (or moved to a different area). The trap will be removed from most displays but historical data will be retained.
Bait Stations
Fields for adding a bait station. Required fields are indicated by *
Bait station number/code: your reference for this bait station. These numbers/codes will be displayed on the map.
Date Installed: defaults to today's date.
Installed by: the name of the person who installed this bait station
Type: select the type of bait station from the drop-down list. If the type is not listed select "other" and use the sub type field to describe it.
Sub type: optionally enter any information such as modifications.
Trap line: select from a list of lines you have set up (default is none). This can be used to filter the bait stations when entering records.
Location: There are two different ways to place your bait station on the map:
- Map: Use the Draw Point tool to locate the bait station on the map. Hold and drag to pan around the map. Click on + or - to zoom in and out.
- Manual coordinates: If you have a GPS location you can enter that in the Manual coordinates field and then click the "Find using Manual Coordinates field" to add it to the map.
Notes: enter any other information you want to keep with this bait station (access, location description, etc.)
Retired: check this box if the bait station is no longer used (or moved to a different area). The bait station will be removed from most displays but historical data will be retained.
Monitoring Stations
Fields for adding a standard monitoring station. Required fields are indicated by *
Number/code: your reference for this monitoring station. These numbers/codes will be displayed on the map.
Monitoring type*: select the Monitoring type from the dropdown list. You can add your own custom Monitoring types in your Project categories section.
Date Installed: defaults to today's date.
Installed by: the name of the person who installed this monitoring station
Line: select from a list of lines you have set up (default is none). This can be used to filter the monitoring stations when entering records.
Retired: check this box if the monitoring station is no longer used (or moved to a different area). The monitoring station will be removed from most displays but historical data will be retained.
Location*: There are two different ways to place your monitoring station on the map:
- Map: use the Draw Point tool to locate the monitoring station on the map. Hold and drag to pan around the map. Click on + or - to zoom in and out.
- Manual coordinates: If you have a GPS location you can enter that in the Manual coordinates field and then click the "Find using Manual Coordinates field" to add it to the map.
Notes: Any other information you want to keep with this station (e.g. access, location description, etc.)
Contact details: The contact details of a person associated with this installation (e.g. land owner)
Images: Add images to this installation (e.g. showing location)
Points of Interest
Fields for adding a standard point of interest. Required fields are indicated by *
Title: your reference for this point of interest. This will be displayed on the map.
POI: select the point of interest type from the dropdown list.
Start date: defaults to today's date.
End date: If the POI has a limited period.
Line: optionally select the line you would like the POI associated with.
Location*: There are two different ways to place your trap on the map:
- Map: Use the Draw Point tool to locate the trap on the map. Hold and drag to pan around the map. Click on + or - to zoom in and out.
- Manual coordinates: If you have a GPS location you can enter that in the Manual coordinates field and then click the "Find using Manual Coordinates field" to add it to the map.
Images: you can upload one or images of this trap
Notes: enter any other information you want to keep with this trap (access, location description, etc.).
Adding installations
Traps, bait stations, monitoring stations, and points of interest are all managed in roughly the same way. The instructions below describe how to add a new installation to a project.
You can also bulk import multiple traps, bait stations, monitoring stations, and points of interest from a CSV file. There are help blocks on each of those pages with what column names are required, and what the allowed values are for each field.
Adding traps
- From the Trap menu click add a new trap.
- Enter the details for the trap (required fields are indicated with an asterix*).
- Trap number*: a reference name for this trap (it doesn't actually have to be a number), this is what will be displayed on the map and can be whatever you wish. If you have a lot of numbered traps it is useful to add leading zeros to the number (e.g. T001, T002. etc). This will allow you to easily sort them numerically by clicking the column header.
- Date installed*: defaults to today's date. This date can be used for maintenance purposes (e.g. you may want to identify traps older than a certain date for replacement).
- Installed by: the name of the person who installed this trap.
- Trap type*: select the type of trap from the drop-down list. If your trap type is not listed select "Unspecified" and uses the "Trap subtype" field to describe it.
- Double trap: check this box if the trap is a double set, or has another trap attached (you can also add supplementary traps later).
- Trap sub type: optionally enter any information such as modifications.
- Sensor provider: if this trap has a sensor attached, you can enter the name of the sensor make or provider (E.g. Econode, Encounter Solutions Ltd, MinkPolice, etc.). When you start typing, the matching provider names will automatically appear.
- Sensor ID: the unique ID of the radio sensor from the provider (this is usually a serial number written on the sensor).
- Send meta data about this trap to my sensor provider: Checking this box will provide the trap location and other details to the sensor provider. This may help them manage their networks.
- Trap line: optionally select the line you would like the trap associated with. This can make it easier when recording trap data in the field.
- Location*: There are two alternative ways to locate your trap on the map:
- Using the map: Click the • ("Draw a point") tool at the bottom of the map and then click on the map to place a point. Ignore the "Manual coordinates" field and button.
- Using manual coordinates: Enter latitude and longitude (degrees or decimal) separated by a space or comma in the "Manual coordinates" field. Click "Find using Manual coordinates field" to place a point on the map at the specified coordinates.
- Images: you can upload one or images of this trap
- Notes: enter any other information you want to keep with this trap (access, location description, etc.).
- Retired: check this box if the trap is no longer used (or moved to a different area). The trap will be removed from most displays but historical data will be retained.
Adding bait stations
Fields for adding a bait station. Required fields are indicated by *
- Bait station number/code: your reference for this bait station. These numbers/codes will be displayed on the map.
- Date Installed: defaults to today's date.
- Installed by: the name of the person who installed this bait station
- Type: select the type of bait station from the drop-down list. If the type is not listed select "other" and use the sub type field to describe it.
- Sub type: optionally enter any information such as modifications.
- Trap line: select from list of lines you have set up (default is none). This can be used to filter the bait stations when entering records.
- Location: use the Draw Point tool to locate the bait station on the map. Hold and drag to pan around the map. Click on + or - to zoom in and out. If you have a GPS location you can enter that in the Manual coordinates field and then click the "Find using Manual Coordinates field" to add it to the map.
- Notes: enter any other information you want to keep with this bait station (access, location description, etc.)
- Retired: check this box if the bait station is no longer used (or moved to a different area). The bait station will be removed from most displays but historical data will be retained.
Adding Monitoring Stations
Fields for adding a Monitoring station. Required fields are indicated by *
Monitoring Station number/ code*: a reference name for this monitoring station (it doesn't actually have to be a number), this is what will be displayed on the map and can be whatever you wish. If you have a lot of numbered monitoring stations it is useful to add leading zeros to the number (e.g.M001, M002. etc). This will allow you to easily sort them numerically by clicking the column header.
Date installed*: defaults to today's date. This date can be used for maintenance purposes (e.g. you may want to identify monitoring stations older than a certain date for replacement).
Installed by: the name of the person who installed this monitoring station.
Monitoring station type*: select the type of monitoring station from the drop-down list. If your monitoring station type is not listed you can add another term under the project categories on your project main page.
Trap line: select from a list of lines you have set up (default is none). This can be used to filter the monitoring stations when entering records.
(Please note: a trapline is a historical term for a route along which a trapper sets traps, your line does not have to include traps)
Retired: check this box if the monitoring station is no longer used (or moved to a different area). The monitoring station will be removed from most displays but historical data will be retained.
Adding Points of Interest
Fields for adding a Point of Interest. Required fields are indicated by *
Title*: This is what will be displayed on the map and can be whatever you wish.
POI Type: There are three main types of Points of interest, hazard, important vegetation, and signage. You can also add your own terms by selecting project categories on the project main page.
Start Date: defaults to today's date.
End date: In the case of a stream this would be left blank. However, in the case of poison signage, it may have an end date.
Trap line: select from a list of lines you have set up (default is none). This can be used to filter the monitoring stations when entering records.
(Please note: a trapline is a historical term for a route along which a trapper sets traps, your line does not have to include traps)
Tags: Add tags to this installation
Adding installation records
In order to add a record to an installation, you need to have the correct permissions.
Adding records to a single installation
You can add a record to an installation using the Rappt.IO app. If you wish to add a record using the website:
-
Select the installation you want to add a record to (from one of your project maps, or the lists of installations in the respective sections of your project).
-
If selecting from a map, click first on the icon for the installation, then click on the link that appears in red font.
-
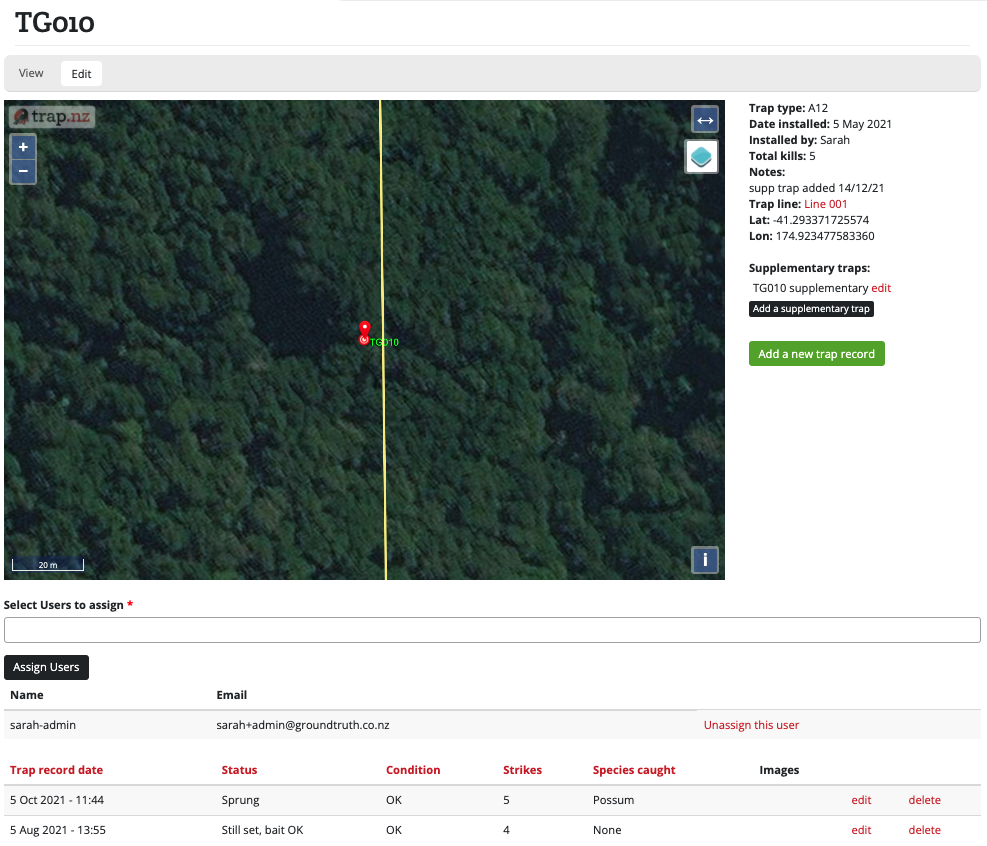
- The page for that installation will load, showing the installation on a map, some information about it, and a table of records (if any) below the map.
e.g.
- Click the green "Add a new (trap/bait station/monitoring) record" button, which will be to the right or below the map, depending on your screen size.
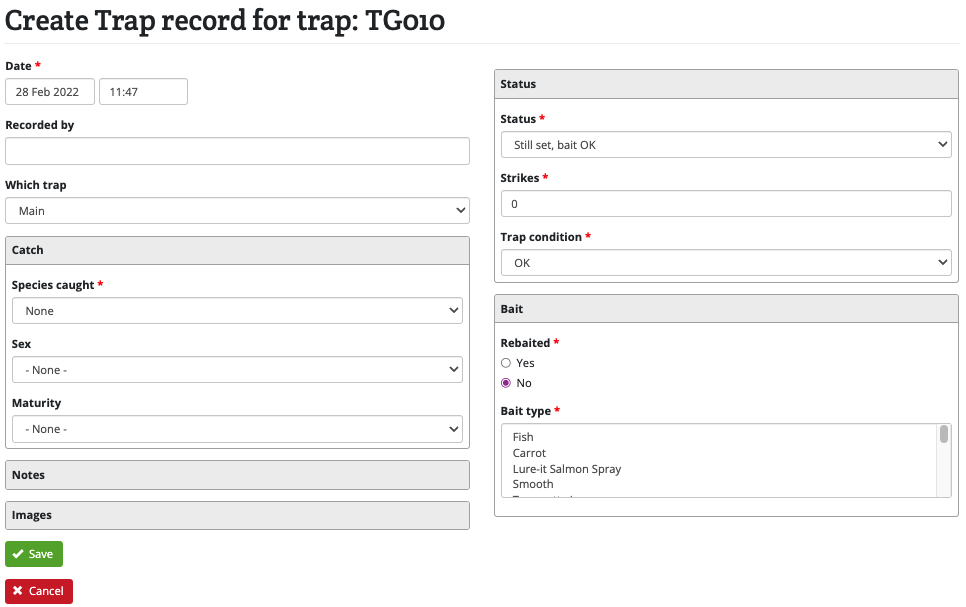
- The form to create a record for that installation will load.
e.g.

-
Enter in the details for this record. The starred fields are mandatory, the other fields are optional.
-
Click the green "Save" button when you are done.
-
The page for the updated installation will be displayed, and the record you created will be shown at the top of the table under the map.
Adding records to multiple installations
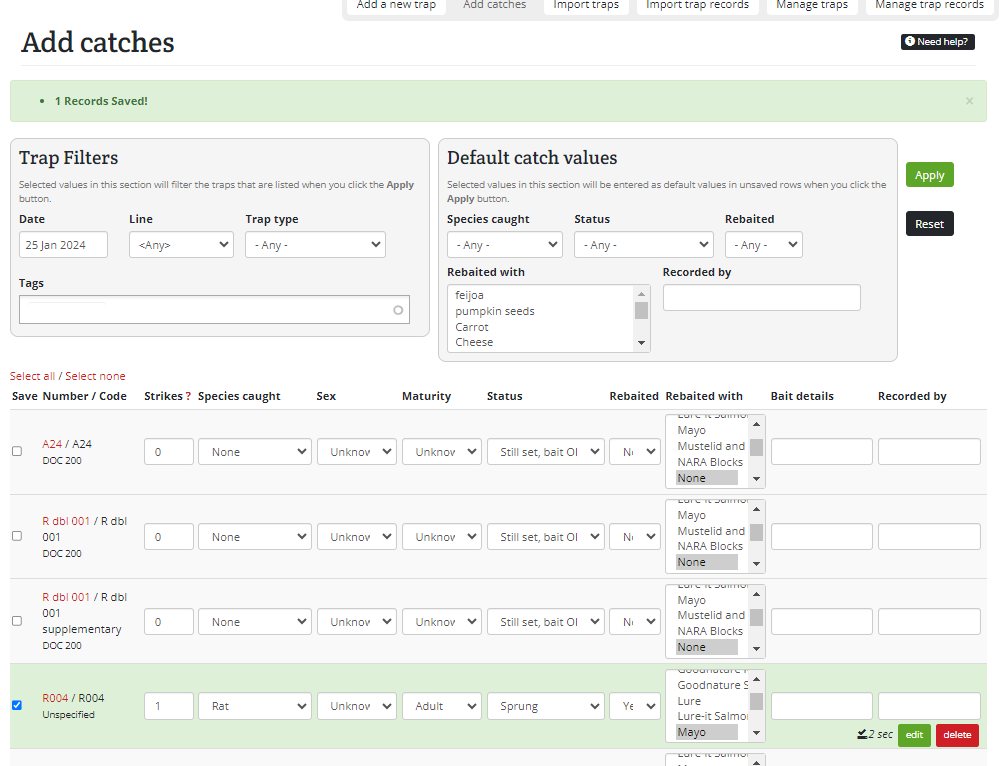
You can use the Add catches page to quickly update multiple traps, as below. This method allows only one record per installation per day, so if you want to add multiple records on one day to an installation, use a different method. Similar instructions will also work for updating multiple stations.
- Set the date for the updates you want to make.
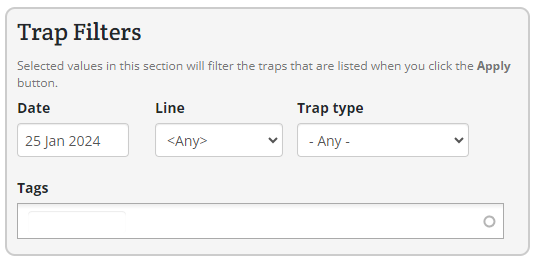
- (optional) If you only want to update some installations in your project, you can filter the installations by specifying a line, tags, or trap type
e.g. only show DOC250 traps on the Southern circuit line

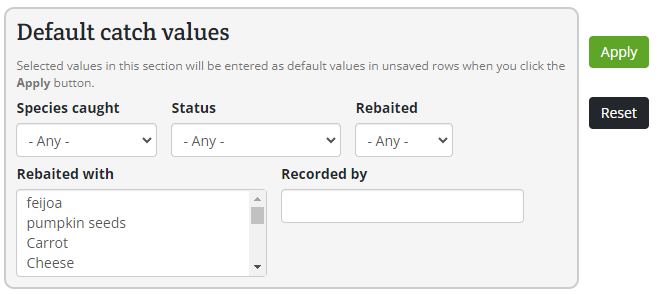
- (optional) In the grey box, you can select default record values.
e.g. all traps caught a rat and were rebaited with cheese

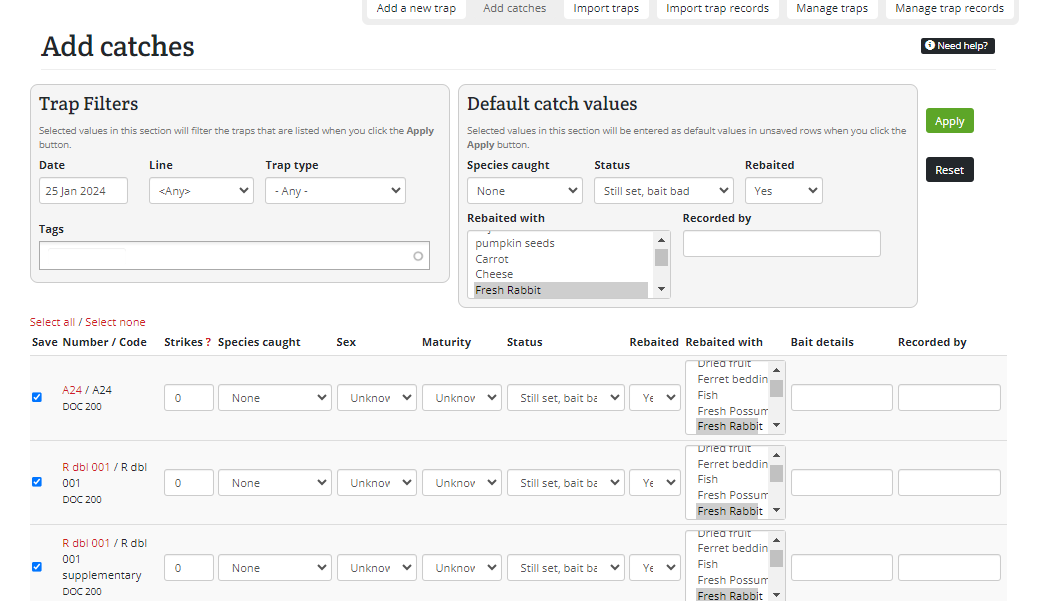
- Click "Apply" and you will see a table appear showing the traps and default information you specified.

- (optional) You can override the default values you set above by editing each installation separately.
e.g. one of the traps didn't catch anything

- (optional) You can deselect the checkbox in the "Save" column of any installation you don't wish to update.
- Check all the information is correct, the click the green "Save" button at the bottom of the page when you're done.
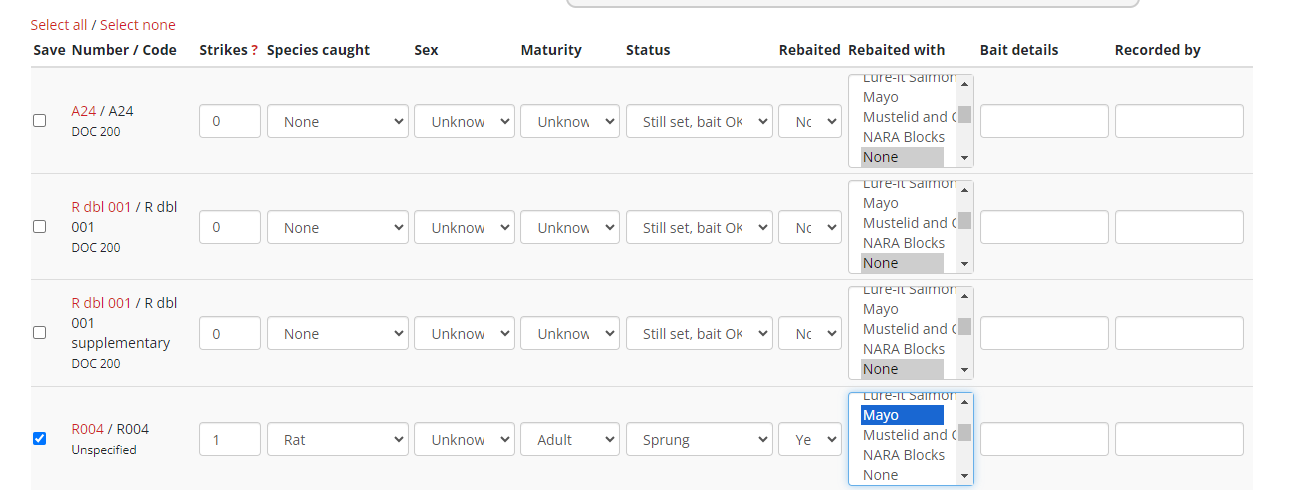

- The rows will turn green to show that the records have been saved for the listed traps.

- If you have made a mistake, you can simply change the values of the appropriate record and click "Save" again. You can also delete individual records or edit them to add more details, such as trap condition or notes.
Adding bait station records
You can use the Add bait station data page to quickly add records to multiple bait stations.
- Apply a filter to select the bait stations you want to enter records for. Mostly you will be filtering by line, but you can also select individual bait stations by entering the first characters of the bait station number or code. By default the filter is set to show active bait stations only - use the dropdown to select retired bait stations.
- Set the date and time to be logged with each record you add. You will need to press the Apply date button whenever you change the date.
- For each bait station, put in the appropriate details and press the Save button.
The first time you add a record you will need to fill in all details. Put in 0 for Bait remaining and Bait removed. For subsequent records these details will be inserted automatically based on the previous record.
For the Active ingredient, Target species, and Formulation fields, a list of predefined values will be displayed once you start typing. Please select values from the list if possible.
Each row in the table shows the last record added (if there are any). You can click the edit button alongside the record to edit the full bait station record. You can edit or delete a record you've just added this way, or you can add notes to the record. The bait station row will turn green when a record has been recently added so that you keep track of where you are up to.
Adding Monitoring station records
You can use the page, Add monitoring station records to quickly add records to multiple monitoring stations.
- Apply a filter to select the monitoring stations you want to enter records for. Mostly you will be filtering by line, but you can also select individual monitoring stations by entering the first characters of the monitoring station number or code.
- Set the start and end date to be logged with each record you add. You will need to press the Apply date button whenever you change the date.
- For each monitoring station, put in the appropriate details and press the Save button.
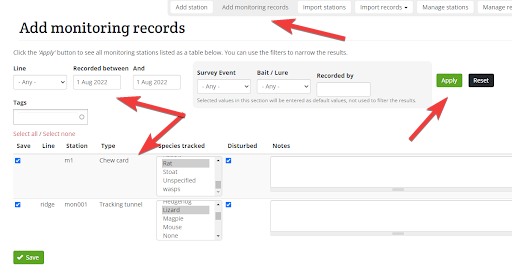
- Check all the information is correct, then click the green "Save" button at the bottom of the page when you're done.
- The rows will turn green to show that the records have been saved for the listed monitoring stations.
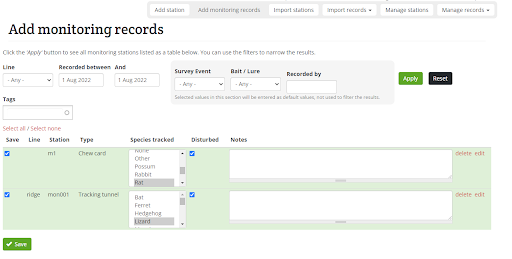
6. The records will now show the changes you have made.
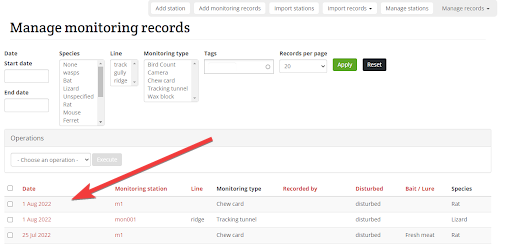
Deleting installation records
- View all of the relevant installations by going to "Traps", "Bait stations", "Monitoring" or "Point of interest" from the project menu.
- Select the installation that you wish to delete records from. You should be able to see the name of the installation, a map of its location, and under the map, all the records associated with it.
- Find the record that you wish to delete from the table below the map, and click the red "delete" button at the end of the row.
- Click the red "Delete" button on the confirmation page to delete the record.

Adding supplementary traps
Note: It is likely that all supplementary traps will be converted to collocated traps in the future as this allows for more flexibilty, so we recommend people create collocated traps, rather than supplementary traps.
A supplementary trap is an additional trap that is part of the same physical set as another trap. It is most commonly used for double trap sets - for example if you are installing a tunnel with two DOC 200 traps inside it. In this case you would add a trap as normal (recording the type, line, location, etc). And then you would add a supplementary trap of the same type to it. You can then record data (trap checks and catches) separately for each side of the trap. However, the two traps remain tied together and the information such as line, location, etc., remains the same for both.
When you add a trap via the website, you can specify that it is a double trap, and this will automatically create a supplementary trap of the same type. It will have the same code with the text "supplementary" appended to it.
Another example is a rat tunnel with a mouse trap included in it. You can add the mouse trap as a supplementary trap and it will remain linked to that set.
Note: you can't add supplementary traps via the App, but you can add "collocated traps".
To add a supplementary trap:
Select the trap, and then click on the Add a supplementary trap button.
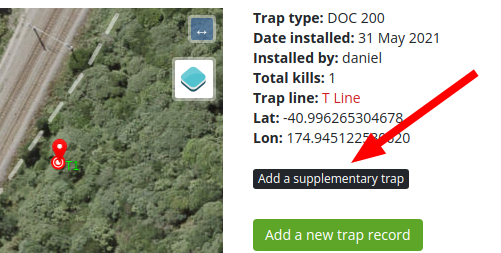
Required fields are indicated by *
Name*: the trap code or reference for this supplementary trap. This is usually displayed in brackets after the name of the parent trap in listings and reports.
Trap type*: select the trap type from the drop-down list. If the trap type is not listed select "other" and use the Trap sub type field to describe it.
Trap sub type: optionally enter any information, such as modifications.
Editing a single installation
The instructions below describe how to edit a single installation. Installations can also be edited in bulk (e.g. when adding many installations to a line).
To edit a single installation
-
Select the installation you want to add a record to (from one of your project maps, or the lists of traps/stations in the respective sections of your project). Click on the link that appears in red font, which will load the page for that installation.
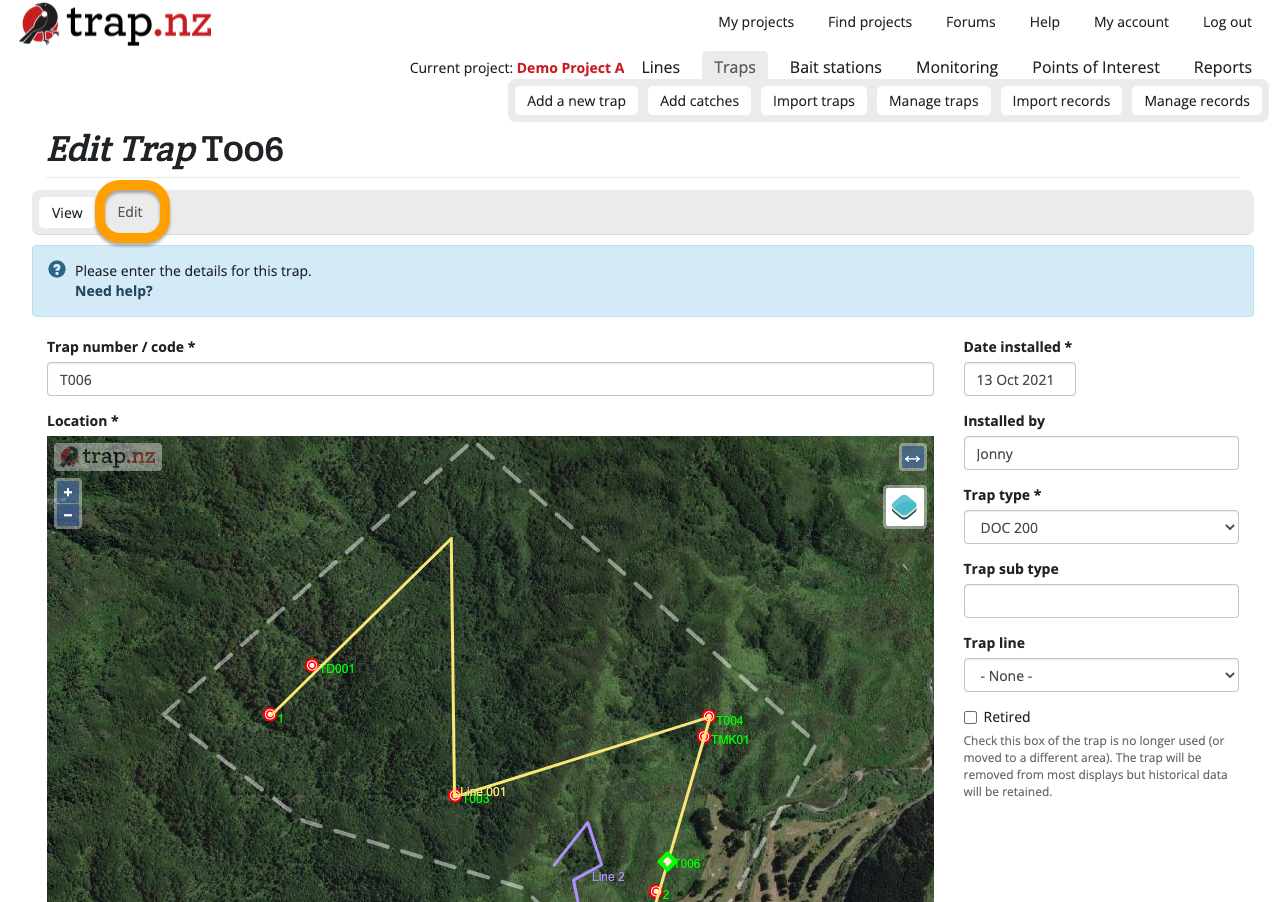
- Click the "Edit" button under the name of your installation at the top of the page (see screenshot below)
- When you've edited the installation, click the green "Save" button at the bottom of the page to save your changes.
Bulk editing installations
Only users with an "Administrator" role in a project can access these tools.
The instructions below are for bulk editing traps. The same method can be used to bulk edit stations, just replace the word "trap" with "bait station" or "monitoring station" as needed.
To bulk edit traps:
- Go to the Manage Traps section of your project (If you have more than one project, check that you're in the right one). You can get there via Traps > Manage Traps in your project menu.
- (Optional) If you have a lot of traps, you can search for the particular traps that you want to edit using the filter bar. Click the green "Apply filter" button to show the filtered traps.
- Select the checkboxes of the traps you want to edit.
- Choose an operation from the Operations dropdown menu, then click the "Execute" button.
- From here you will be guided to edit the selected traps in whatever way you have selected.
- Check your edits and click the green "Confirm" button to save your changes.
For video help, click the youtube link here https://youtu.be/g4bkmiPNlqs

Bulk editing operations include:
- Add / remove tags
- Assign / unassign members to traps & stations
- Delete traps & stations
- Change trap & station details
- Date installed
- Installed by
- Type
- Sub type
- Line
- Retired
- Trap sensor provider
- Send Meta Data about this trap to your sensor provider?
- Trap notes
- Move selected traps & stations to another project
- Remove sensors from traps
- Retire traps
- Modify members' sensor notifications subscriptions
Downloading installation data
Installation data (including name, type, location etc.) can be downloaded to a CSV or KML file. CSV files are most commonly used - they can be viewed and edited easily in spreadsheet programs like Excel or Google Sheets. KML files are useful if you want to open the data in ArcGis Explorer or Google Earth.
Downloading installation record data is a different process.
To download installation information:
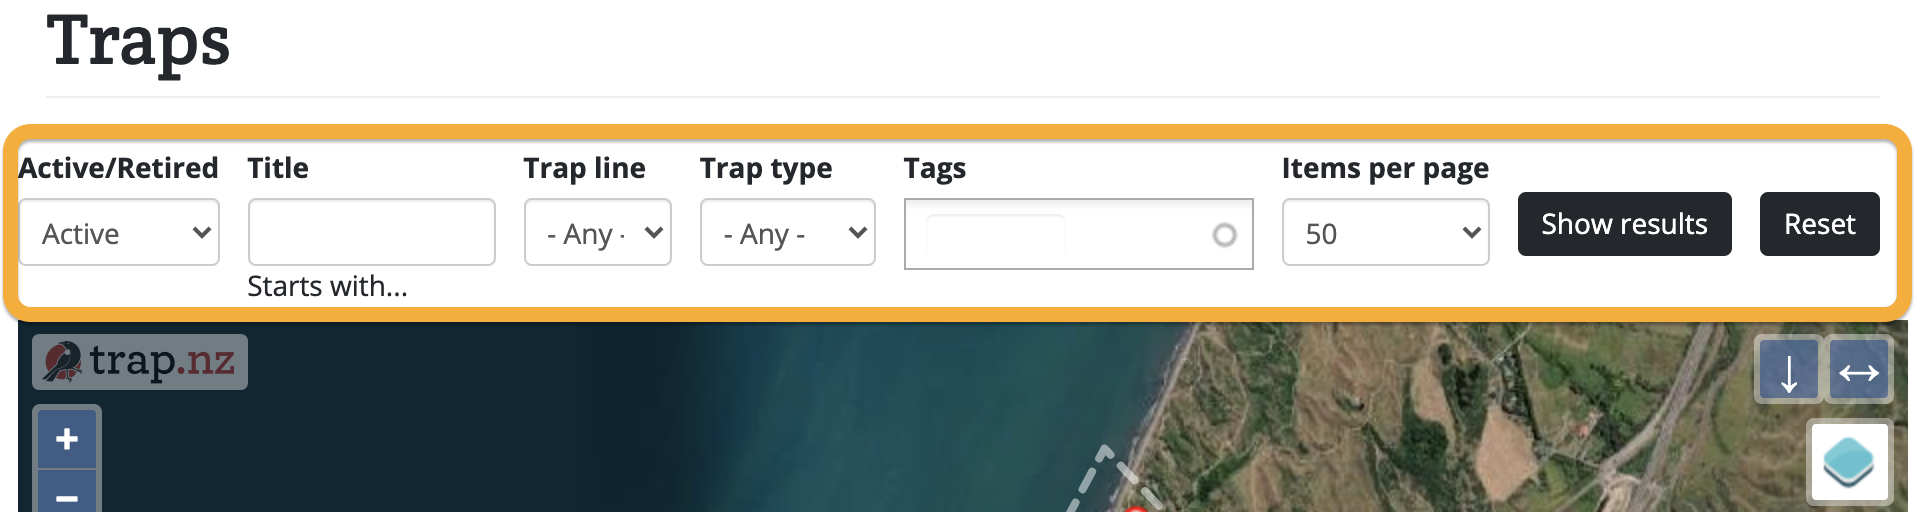
- Navigate to the Traps, Bait Stations, or Monitoring Stations section of your project.
- (Optional) Apply any filters using the filter bar (e.g. filter by line). The downloaded file will respect your current filters for that overview page

- Click the "Show results" button to populate the table below the map.
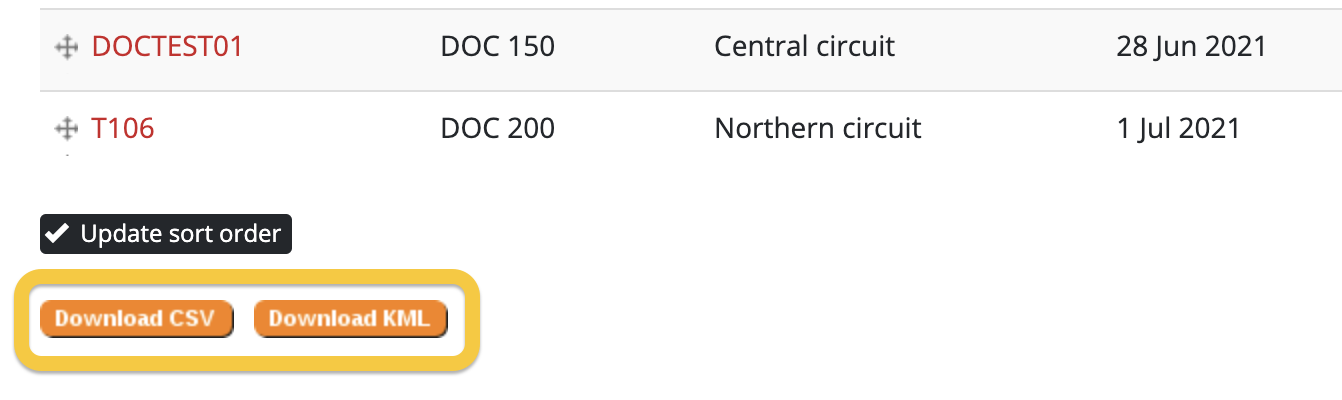
- Scroll down to the bottom of the page and click the "Download CSV" button to download a CSV file, or the "Download KML" button to download a KML file.

- When prompted, select a location on your device to save the file.
Sorting installations
On the Traps, Bait Stations, or Monitoring Stations section of your project, you can sort the order in which your installations appear in the table underneath the map (once you've clicked the "Show results" button). Clicking on a column heading will sort them by that column. Click the heading again to reverse the sort order.
Custom sort order
You can also manually sort the order in which installations are listed in the table.
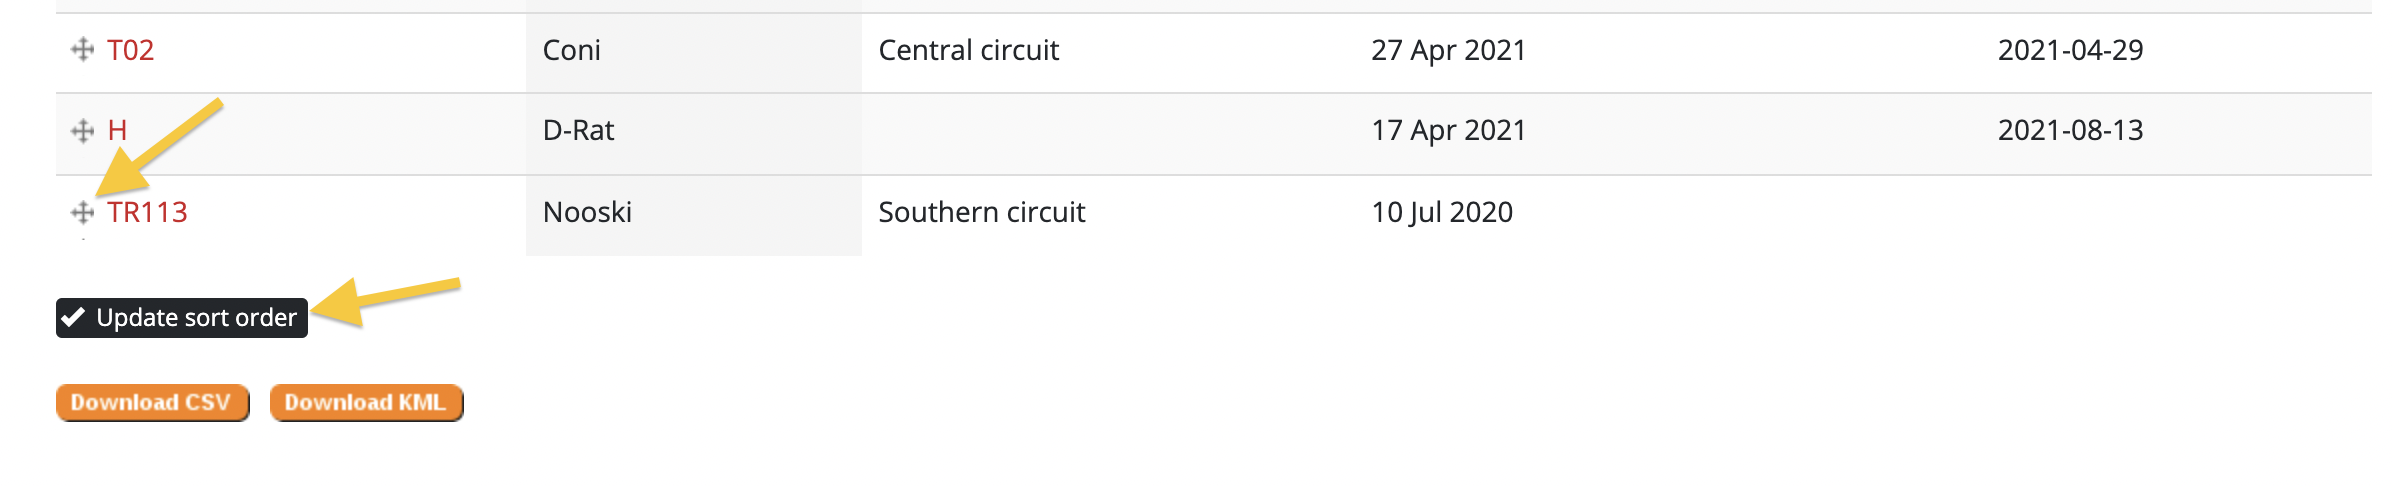
Please note that with the new trap overview page you will still temporarily have to use the "old view" found under the "traps" heading to gain access to the ability to sort
- Click and hold the handle to the left of its Number/Code to drag it up or down.
- When you are done sorting, click the "Update sort order" button at the bottom of the table to save it.

Sorting all installations in a line
You might want to make the order in which installations are listed on a line match the order in which you check them. If you use the mobile app to enter installation records (recommended), this can make recording data in the field more efficient.
Before you can sort your installations, you need to make sure that you are viewing all the installations for a line. To do this, use the filter options at the top of the page.
- Navigate to the Traps, Bait Stations, or Monitoring Stations section of your project.
- Select the line you want to sort from the "Line" dropdown in the filter bar.
- Select "- All -" from the "Items per page" dropdown.
- Click "Show results"

- You can now manually sort your installations into whatever order you like. Click the handle to the left of its Number/Code, and drag it up or down
- When you are done sorting, click the "Update sort order" button so that your hard work is saved!

Moving installations
See also: Moving installations using the app
- been the one who added the installation to the project, or
- a Manager or Administrator role in the project
Moving an installation that already has records associated with it
If you are physically moving an installation that already has records associated with it, best practice is to “retire” the installation and create a new one in the new location. This keeps old records correctly associated with the old location.Moving an installation that has been incorrectly located on the project map
- Select the installation you want to relocate from either a list of installations, or by clicking on it on a map

- The page for that installation will load
- Click the "Edit" button

- The "Edit installation" page will load
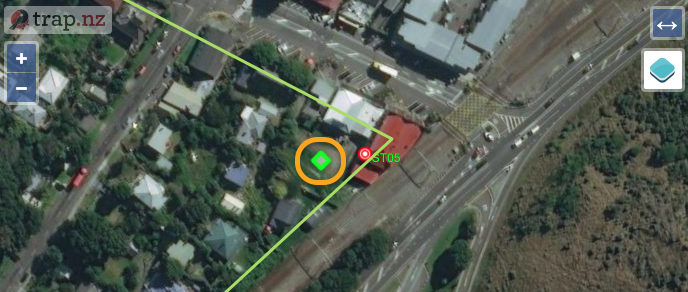
- Zoom in on the trap on the map, so that its current location and the location you want to move it to, are both visible.

- Click the "Draw a point" icon on the map
- Click on the new location for this installation on the map
- A dialog box will appear, asking you to confirm that you want to move the installation's location on the map
- Click "OK" to confirm
- The map will now show a green square where the installation will be moved to

- Click the green "Save" button at the bottom of the page to save your changes
- The page for that installation will load, showing the installation at the new location on the map


For video help, click the youtube link here https://youtu.be/244cp2wbmSk
Moving installations between projects
The instructions below outline how to move traps between projects. The process is basically the same for moving bait stations and monitoring stations, just replace the word "trap" with "bait station" or "monitoring station". You can also move lines and POIs in the same way.
Here is the link to the video instructions https://www.youtube.com/watch?v=IJUXDc0Gmhw
Installations can be moved between projects only by a user who is an administrator of both projects.
Moving traps between projects
-
From the "My projects" page, select the project you want to move traps away from
-
Click on the "Traps" section
-
Click on "Manage traps"
-
Select the checkboxes for the traps you want to move to another project
-
Select "Move selected traps to another project" from the dropdown "Operations" menu
-
Click the "Execute" button
-
Select the "Target project" (the project you want to move the traps to) from the dropdown menu
-
Click the "Next" button
-
Check the list of traps to move, and click "Confirm" to move them to the new project


Please note, when you move the installations the lines do not move with them these have to be moved separately. If you import the installations to the new project via a csv file, the records attached to the installations will not transfer to the new project.
Retiring installations
Deleting installations
An installation can only be deleted if there are no records associated with it.
If you wish to delete an installation which has records associated with it, you have two options. You can either:
- delete all the installation records before deleting the installation, or
- retire the installation (which means it will not be visible in your project, but you can still run reports that include it)
If you wish to delete multiple installations at once, you can do this by bulk editing installations.
To delete an installation:
- Select the installation you wish to delete (you can do this from your main project page or from the "Traps", "Bait stations" or "Monitoring" sections of your project). You should be able to see the name of the installation, and a map of its location.
- Click on the "Edit" button near the top of the page

- Scroll down to the bottom of the page and click the red "Delete" button

- Click the red "Delete" button on the next page to confirm deletion of this installation.
Lines
Lines allow you to group installations together. Often they are used to follow a physical track or path, but they can be used however it makes sense within your project (they don't require a defined location).
When adding installations, you can associate them with a particular line. This allows you to create records and reports which are filtered by their line.
Adding lines
How to add a line to your project
- Select your project from your My Projects list.
- Click on the Lines section of your project.
- Select Add line from the Lines menu.
- Enter the details for the line (required fields are indicated by *).
- Line name*: Give the line a descriptive name
- Line type*: Lines can be used to group any combination of traps, bait stations and/or monitoring stations. Select the types of stations which will be on this line (you can select more than one choice by holding down the control on your keyboard while clicking).
- Select colour: Choose which colour you want the line to be on the map.
- Location: Lines don’t require a physical location on the Rappt.IO system - some projects use lines simply to group installations together, though most often they are used to follow a physical track or path.
There are three different ways to add a line location:- Using the map:
- Use the — tool at the bottom of the map to draw the line on the map
- Double-click to finish drawing.
- If the line is not in the right place, delete it using the "Delete features" button, and re-draw the line.
- Using the Data field below the map:
- The Data field allows you to cut and paste shape data in WKT format recorded from the Rappt.io App, or from GIS systems such as ArcGIS or Quantum. If you add WKT here it will be used instead of the map drawing.
- Note: the CRS is ESPG:4326
- Note: the CRS is ESPG:4326
- The Data field allows you to cut and paste shape data in WKT format recorded from the Rappt.io App, or from GIS systems such as ArcGIS or Quantum. If you add WKT here it will be used instead of the map drawing.
- Using GPX:
- If you have a GPX file for the line, you can upload it then click the "Place line using GPX file" button to place the line on the map. Note that the GPX file should contain a route or track log, not installation locations or points.
- Using the map:
- Click the green "Save" button at the bottom of the page
Editing lines
- Start from the Lines section of your project (If you have more than one project, check that you're in the right one)
- Scroll down to the list of lines under the map, and select the line you wish to edit.
- Click on the “Edit” button above the map
- Here you can edit the line name, type, colour and location. (For instruction on how to edit the line on the map, watch the video above.)
- When you are done, click the green “Save” button at the bottom of the page.

https://www.youtube.com/watch?v=kFW_Hngk_vY
Managing line installations
Only users with an "Administrator" role in a project can access these tools.
Note: The line needs to exist in your project before any installation can be added to it. You can learn how to create lines here.
Managing line installations can be done at the individual level by setting the Line field while editing an installation, however in many cases it makes more sense to do this via bulk editing.
Adding a single installation to a line
To add a new installation to a line:
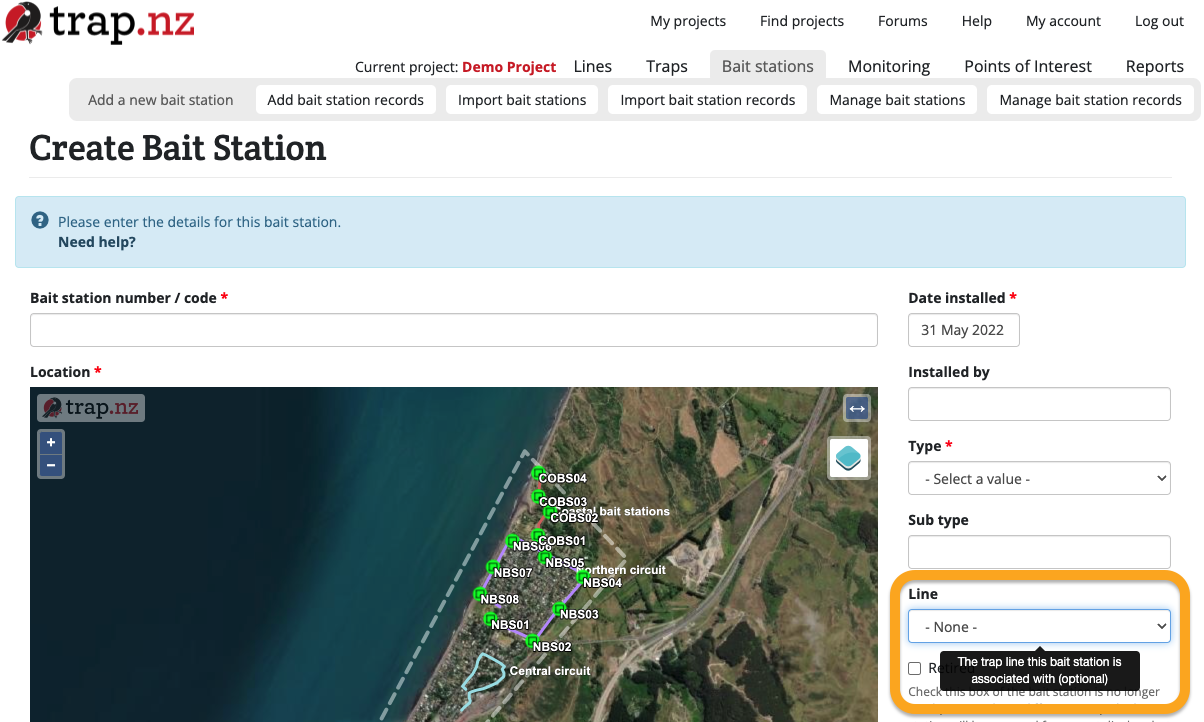
When you're adding an installation to your project, you can add them to a line at this stage by selecting the line from the dropdown menu labelled "Line" on the Create Installation form.
e.g. When creating a new Bait Station
To add an existing installation to a line:
If you want to add an existing installation to a line, you can do this by editing the installation, and selecting the line from the "Line" dropdown menu.
Adding multiple installations to a line
You can add multiple installations to a line from the "Manage Traps / Manage Bait Stations / Manage Monitoring Stations" menu.
While multiple installation types (e.g. Traps and Bait Stations) can be part of the same line, each installation type needs to be added one-by-one (e.g. you can add multiple traps to a line using the instructions below, then to add multiple bait stations, repeat the same steps in the Bait Stations section of the website).
To add multiple installations to a line:
- Select the project from your My Projects list.
- Go to the Manage Traps / Manage Bait Stations / Manage Monitoring Stations section of your project.
- (Optional) If you have a lot of installations, you can search for the particular installations that you want to edit using the filter bar. Click the green "Apply filter" button to show the filtered traps.
- Select the checkboxes of the installations you want to edit.
- From the Operations dropdown menu, select Change trap details / Change bait station details / Change station details.
- Click the "Execute" button.
- Select the "Line" checkbox, and select the line that you want to add the installations to.
- Click the "Next" button.
- Check your changes and click the green "Confirm" button to save your changes.
For video instructions click this link https://www.youtube.com/watch?v=g4bkmiPNlqs
Removing installations from a line
To remove installations from a line, follow the instructions above, but instead of selecting a line, select "None".
Downloading line information
Line information (line name, colour, and a wkt string describing the line path) can be downloaded to a CSV file. CSV files can be viewed and edited easily in spreadsheet programs like Excel or Google Sheets.
To download line information:
- Navigate to the Lines section of your project.
- (Optional) Choose which line(s) you want to download from the line filter list. Click the green "Apply" button to apply the filter.
- Scroll down to the bottom of the page and click the "Download CSV" button.
- When prompted, select a location on your device to save the file.
Organisations
Organisations are a way of grouping multiple projects together. Members who are added to an organisation automatically gain access to all of the projects in that organisation (to view, edit, and report on data).
Organisations overview
Rappt.IO organisations are used by groups who trap in multiple geographic regions but want easier ways to:
- manage members across their projects
- run reports across their projects
Organisations are usually used by government departments and councils, however they are available to be used by any group that would find them helpful.
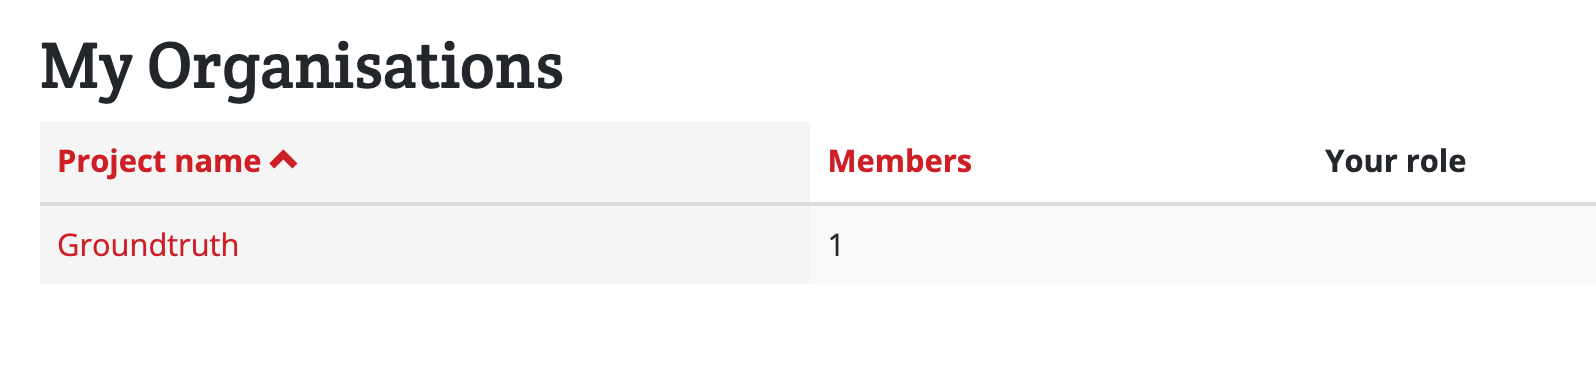
By going to your My projects page you can see which organisations you belong to. Your list of projects will include projects which you now have access to via your organisation membership.
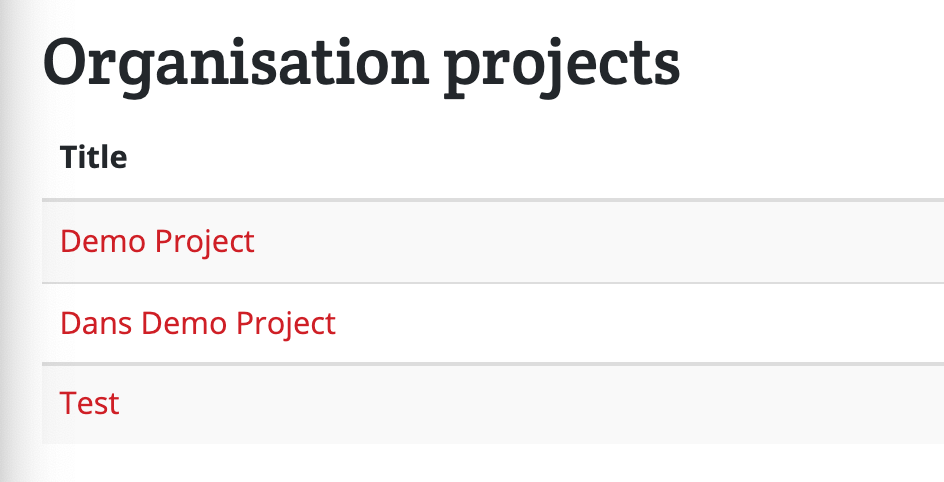
You can see which projects belong to an organisation by clicking on the name of the organisation on your My projects page.
Creating an organisation
The tech team at Rappt.IO can create an Organisation for you. There's no way of a user doing this themselves at the moment.
If you'd like us to setup an Organisation for you, please email support@rappt.io with this information:
- what you'd like to call your Organisation
- the Rappt.IO account email address of one person to add as the Org Admin
- one project that the above person is Administrator of, that you want added to the Organisation
Editing Organisation details
Only users with the Org Admin role are able to edit access these tools.
As an Org Admin, you can edit the details of your existing Organisation, including the Organisation's name and description.
To edit Organisation details:
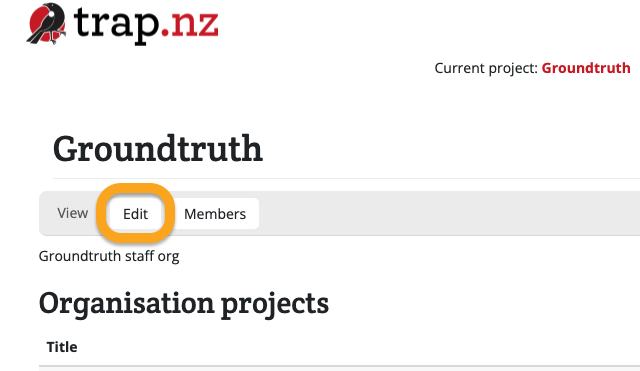
- From your My Projects page, under the "My Organisations" heading, click on the name of the Org that you wish to edit.
- Click the "Edit" button

- A form will load, where you can edit the Org title/name and description
- Click the green "Save" button to save your changes
Organisation roles
In addition to the four project roles, organisations provide an additional two roles: Org member and Org admin.
- Org members can:
- Add lines, stations and records to all projects within the organisation
- View records and stations in all projects within the organisation
- Run reports against all projects within the organisation
- Org admins can:
- Do everything a project administrator can do, to any project within the organisation
- Add and remove people from the organisation (and thus the member projects)
- Change an organisation members role
Adding and removing organisation members
Adding members to your organisation, and removing members from your organisation works the same as it does for projects.
- Go to My projects and click on the name of the organisation to go to your organisation homepage
- Follow the instructions for adding and removing project members.
Adding and removing Organisation projects
In order to add or remove projects to an Organisation, you must be both the project's Administrator, and a member of the Organisation.
Adding a project to an Organisation
- Go to the "Edit project" page
- In the "Extra (optional)" section, is a field where you can select which Org(s) you want to add that project to. See the bottom right of the screenshot below, where I'm editing "Demo Project A"
- Select the Org(s) you want this project to belong to from this section
- Click the green "Save" button at the bottom of the page
- This project is now part of the Org you selected